Overview
Logging into Relay’s CX Builder requires multi-factor authentication (MFA) after inputting your password. This is a Relay-mandated requirement and cannot be disabled. Once you complete the one-time setup, you'll use your preferred authenticator app on your phone to retrieve the 6-digit code required to login to CX Builder moving forward.
Time required: ~5 minutes
What you'll need: Your phone, with preferred authenticator app installed
Setting up MFA
Step 1: Download Authenticator App
Check with your internal IT team to see if there is a preferred authenticator app to use. If your organization doesn't currently have an authenticator app issued — here's what we recommend. All of these options are FREE and available on iOS or Android.
Microsoft Authenticator – Widely recognized; a strong option if your organization already uses Microsoft 365 or Entra ID for other logins, since it's a familiar name even without an enterprise policy attached.
Google Authenticator – Simplest install experience of the mainstream options.
Okta Verify - Best fit if you already use Okta elsewhere in your organization, even informally.
Duo Mobile — Good fit if IT team is security-conscious and may already be evaluating or using Duo for other systems.
Step 2: Check for Relay-issued Email
You will receive a Relay-issued email inviting you to login on the new platform.
For staging login, you will receive an email from: mail.relaystaging.com asking you to log into CX Builder.
For production login, you will receive an email from: mail.relaynetwork.com asking you to log into CX Builder.
Please make sure that those email addresses are whitelisted at your organization and be sure to check spam the day(s) of the transition before requesting support.
.png)
Screenshot: Sample set up email that CXB users will receive
This is NOT spam. If you have certain privacy settings enabled in your email, you may have to download external images or update your settings.
Step 3: Input your email and password
You will have to input your existing username and password on the new site before the MFA QR code prompt pops up. This will enable set up of the MFA process.
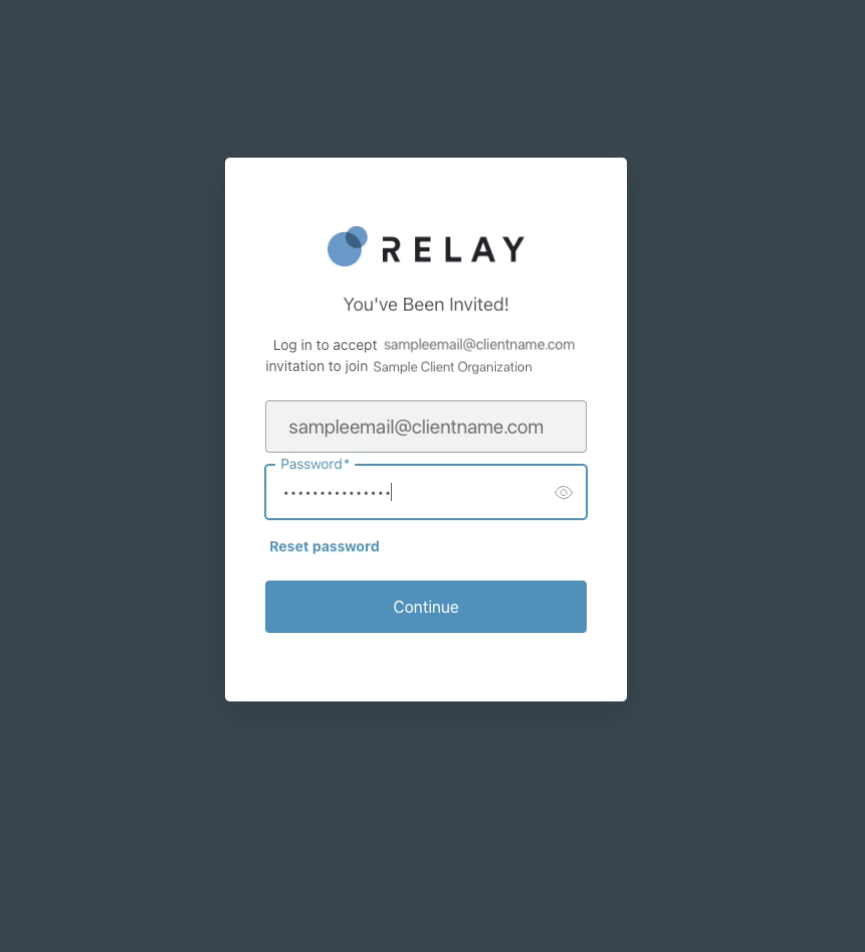
Screenshot: Email and password page to login
Step 4: Open authenticator app on your phone and scan
Switch to the authenticator app on your phone and scan the QR code displayed on the screen.
DO NOT attempt to scan the QR code with your regular Camera app, it will not work.
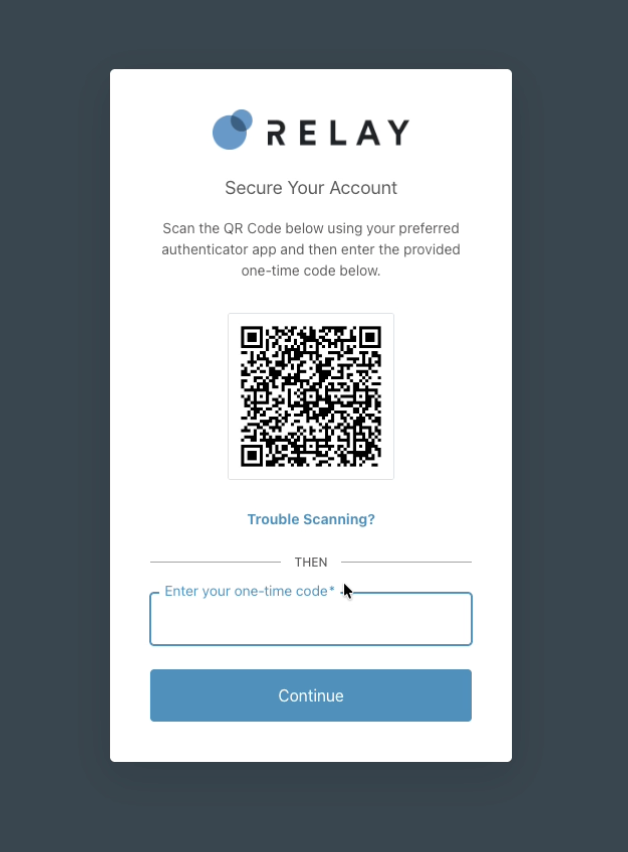
Screenshot: Example of QR code to scan using authenticator app
Step 5: Input 6-digit code
After scanning the QR code, input 6-digit code that it generated.
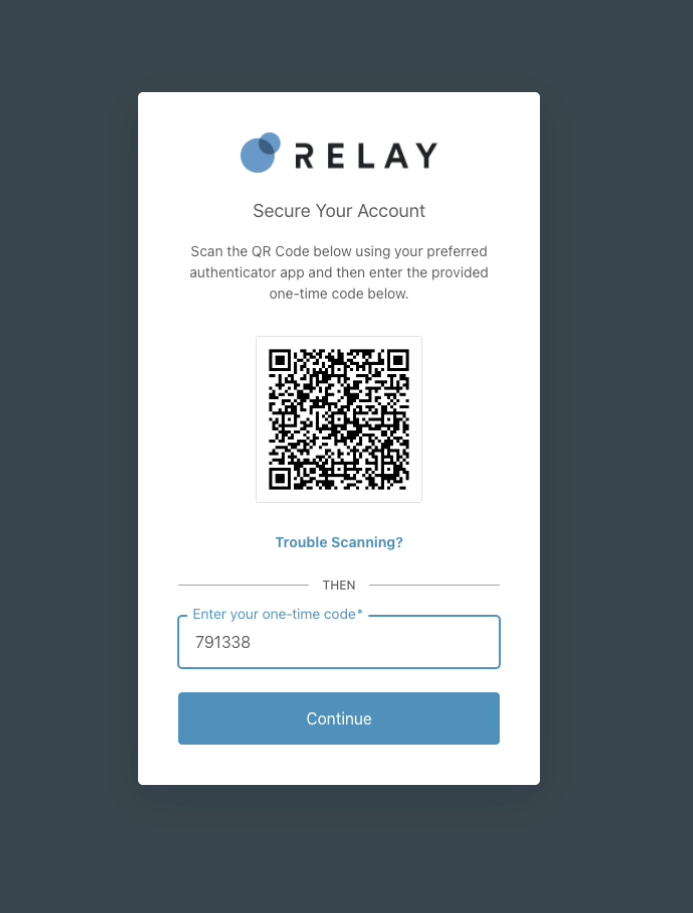
Screenshot: Example of QR code + 6-digit provided code
Step 6: Login to CX Builder
Hit continue and login directly to CX Builder.
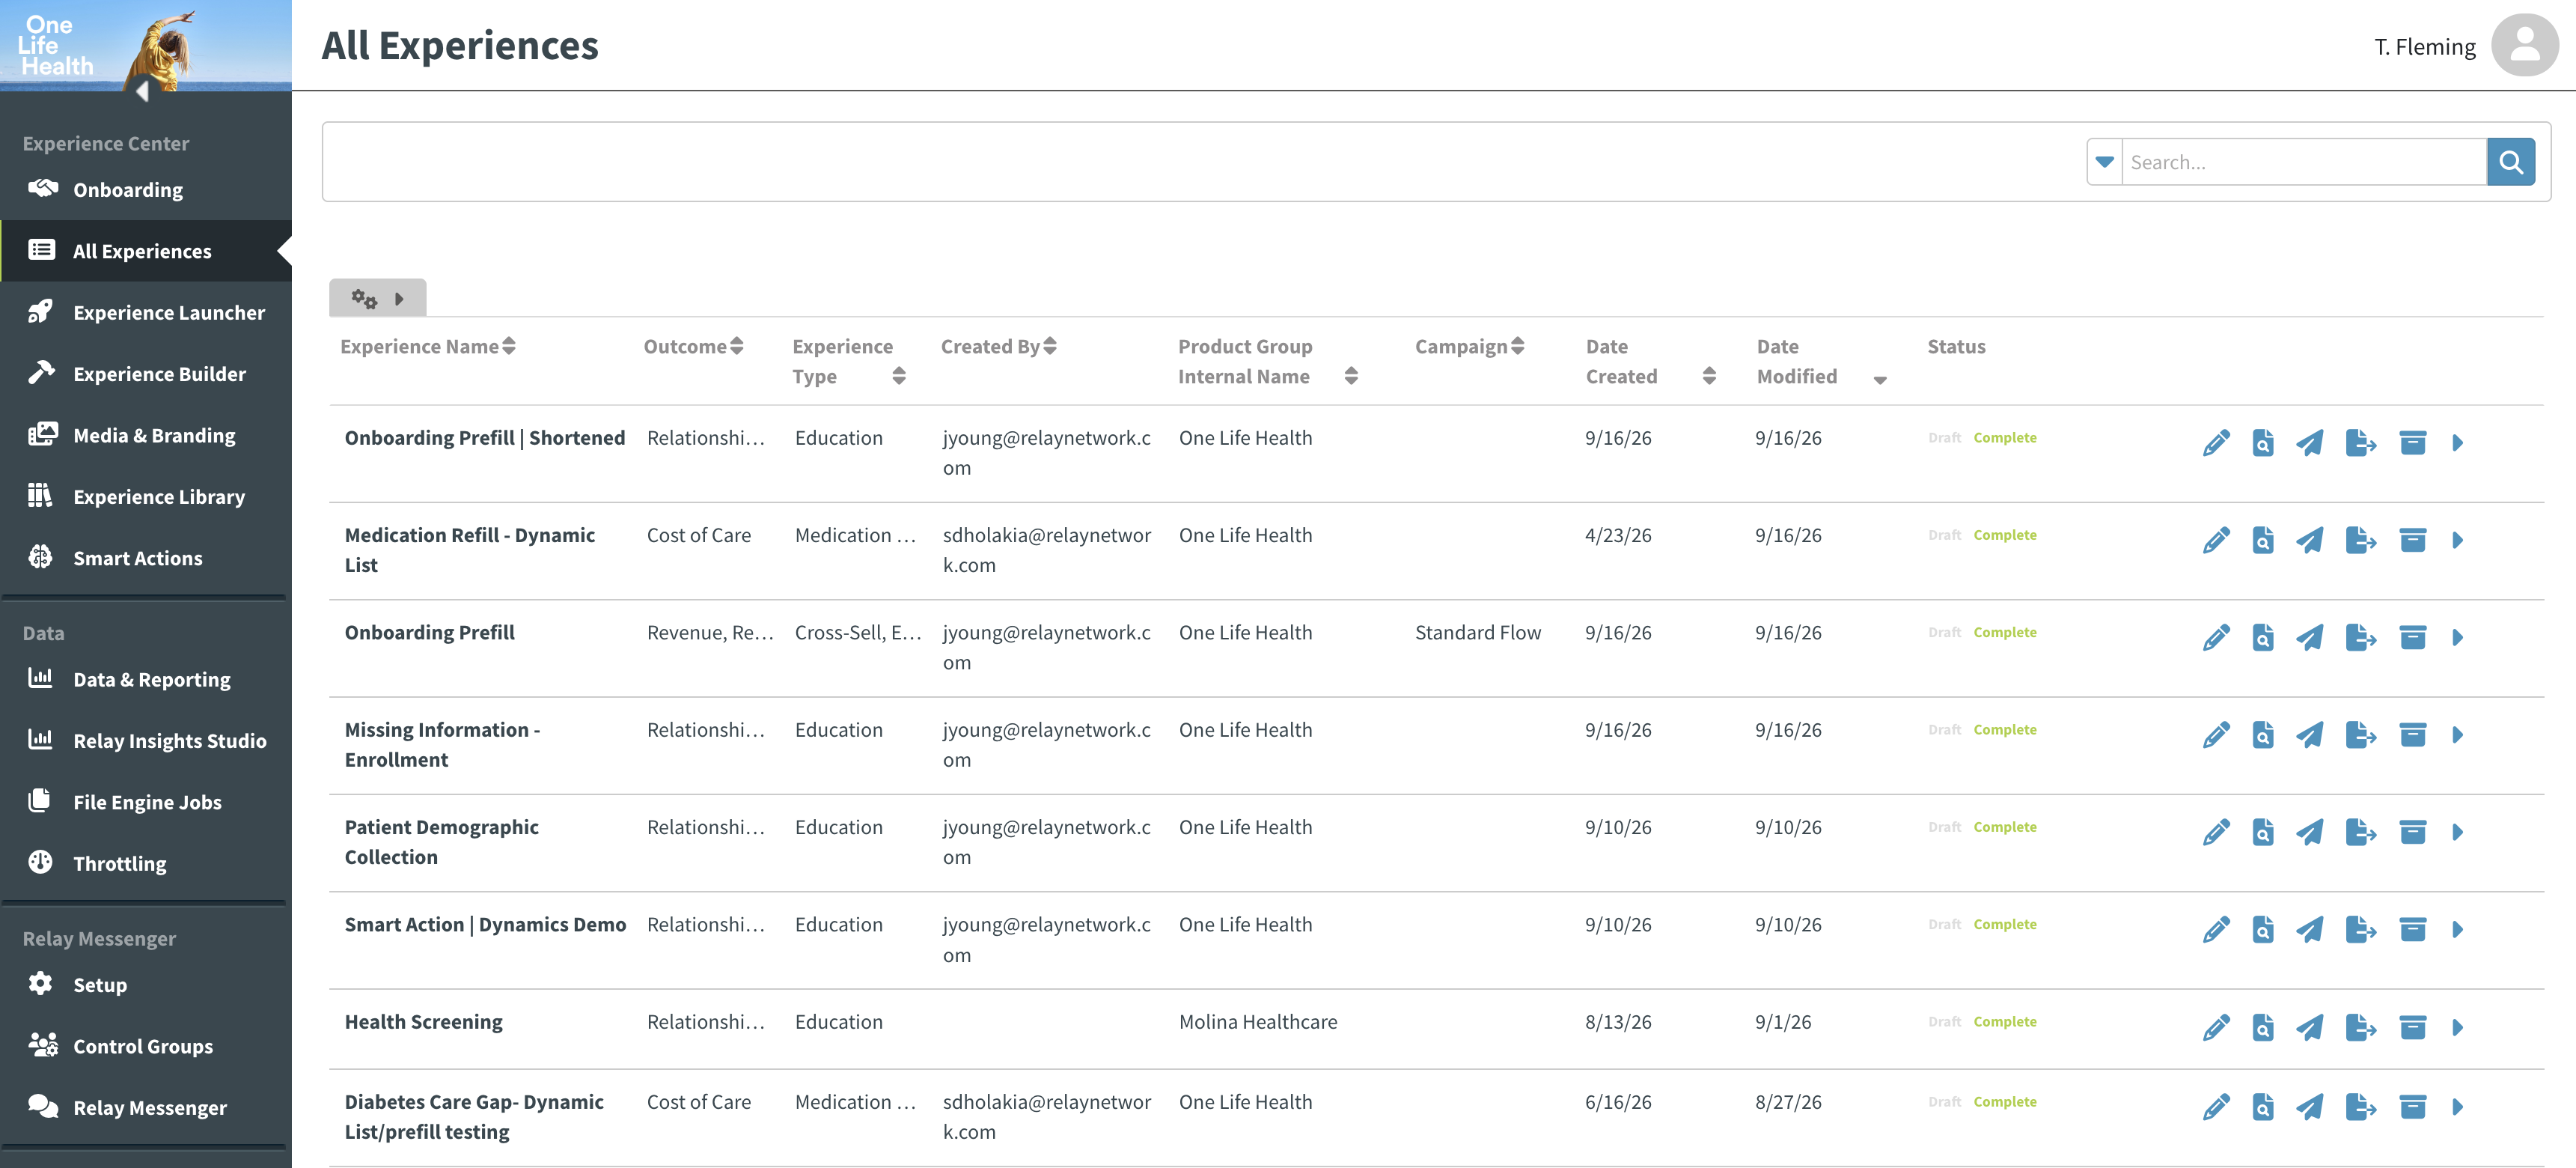
You have now enabled MFA for CX Builder login. Moving forward, you will be prompted to input the rotating 6-digit code from your authenticator app every time you login into CXB. The code refreshes every 30 seconds. See screenshots of the flow below:

Screenshots: Login screen to enter CX Builder, Enter 6-digit code, 6-digit code entry
If you get a new phone you will be required to contact an admin to remove the linking to your old device which will allow you to perform the above steps again.
What To Expect on your Mobile Device
When setting up the account in your preferred authenticator app, you will want to name the account so that you are using the right code for the right login. If you are someone who uses both staging and production, you will have two separate accounts in the authenticator app that display a separate code for each environment. Follow the steps below to ensure accounts are properly labeled.
Open the authenticator app and find the "Add Account" control — usually a + button in the top-right or bottom-right corner.
Scan QR code by pointing the camera at the QR code shown on Relay's MFA setup screen
Name the account/entry something recognizable, like "Relay CX Builder - [company name]," especially useful if you manage MFA for multiple tools.
If you have logins for both staging and production, you will have two separate accounts. Please name those accordingly, so you don’t mix up codes when trying to log in to each environment.
If you have any questions, please reach out to your internal Relay contact or your Client Success Manager for support.
FAQs & Troubleshooting
This document answers the most common questions users have during the one-time setup of MFA for CX Builder and provides troubleshooting steps for the issues we see most often.
At a Glance | |
|---|---|
Staging invitation sender | mail.relaystaging.com |
Production invitation sender | mail.relaynetwork.com |
Supported authenticator apps | Microsoft Authenticator, Google Authenticator, Okta Verify, Duo Mobile |
Setup link validity | 5 days, or until a newer invitation is sent |
Account lockout | After 10 failed sign-in attempts |
Authenticator code refresh | Every 30 seconds |
Quick Links:
Setup and Invitation Emails
Authenticator App and QR Code
Logging In
Setup Invitations and Emails
Q1. Is the MFA setup email legitimate?
Yes. It is smart to double-check before clicking anything unexpected, but this email is legitimate and expected. Email invitations will come from the following domains:
Staging: mail.relaystaging.com
Production: mail.relaynetwork.com
If the email has missing images, it may be due to certain privacy settings enabled in your email. If you “download external images,” you should be able to see the entirety of the email.
To complete setup:
Install an authenticator app. Microsoft Authenticator, Google Authenticator, Okta Verify, and Duo Mobile all work.
Open the email and click the link in the invitation.
Sign in with your existing CX Builder email and password.
Scan the QR code using the authenticator app, not your phone’s camera.
Enter the 6-digit code the app generates. Setup is complete.
See above for screenshots of each step: Setting up MFA
Q2. I never received the setup email.
This is easy to fix, and you do not need to wait for Relay to resend anything.
Go to CX Builder and sign in as you normally would. The on-screen instructions will walk you through sending a new setup email, which should arrive within a few minutes.
If it does not arrive:
Check your spam or junk folder.
If your organization filters external email, ask your IT team to allow-list mail.relaystaging.com (staging) and mail.relaynetwork.com (production).
Once the email arrives, the walkthrough guide covers the remaining steps, including installing an authenticator app.
Q3. My setup link says it has expired.
Setup links expire after 5 days. A link can also expire sooner if a newer invitation has been sent. Each time a new invitation goes out, all previous invitations stop working and only the newest one is valid.
A new invitation is sent automatically whenever you try to sign in to CX Builder without using the invitation link. If you signed in directly or requested a resend, any older email in your inbox is no longer valid.
WHAT TO DO
Use the most recent setup email you received. If you are unsure which one that is, sign in to CX Builder directly to trigger a fresh invitation, then use that new email.
Authenticator App and QR Code
Q4. Scanning the QR code opens another app or gives a code CX Builder will not accept.
This almost always means the QR code was scanned with the phone’s built-in camera instead of an authenticator app. The phone camera does not register the account, so it cannot produce a valid code.
WHAT TO DO
Open your authenticator app (Microsoft Authenticator, Google Authenticator, Okta Verify, or Duo Mobile), choose the option to add an account, and scan the QR code from inside the app. Then enter the 6-digit code it displays.
Q5. I scanned the QR code in my authenticator app, but CX Builder says the code is invalid.
The most common cause is reading the wrong entry in the authenticator app. To troubleshoot, work through these steps in order:
Check for duplicate entries. If you use your authenticator app for other tools, you may have several entries. Use the newest one that was generated when you scanned the QR code.
If you scanned the Relay QR code more than once, you may have several Relay entries. Use the newest one and delete the older ones.Confirm the environment. Staging and production each have a separate entry with its own code. Make sure the entry matches the environment you are signing in to.
Check the entry name. If your app holds codes for other tools, confirm you are reading the Relay entry. We recommend naming it something like “Relay CX Builder – staging/production” so it is easy to find.
Enter the code before it refreshes. Codes change every 30 seconds. If the current code is about to expire, wait for the next one.
Check your phone’s clock. If your phone’s date and time are not set to update automatically, codes may be rejected.
TO PREVENT THIS
You can label each entry with the name of the environment it is associated with. If you use both staging and production, we recommend naming each entry separately with something like “Relay CX Builder – Staging” and “Relay CX Builder – Production”.
Logging In
Q6. I am stuck in an endless login loop.
A sign-in loop is usually caused by stored browser data from a previous session. Try the following, in order:
Hard refresh the page. For Windows, press Ctrl + Shift + R or for Mac, press Cmd + Shift + R.
Clear your browser cache and cookies, then reopen CX Builder.
Open a private or incognito window and sign in from there.
Q7. My password is not working, or my account is locked.
During setup, you sign in with your existing CX Builder email and password first. The QR code appears after that, and you should not be asked for your password again after scanning.
Your password must be identical to the one you used before MFA. A new password will not work unless you reset it first.
If you are unsure of your password, click Reset password, then return to the sign-in page and sign in again.
Always use the most recent setup email. Older invitations stop working once a new one is sent.
ACCOUNT LOCKED
After 10 failed sign-in attempts, your account is temporarily locked. Waiting is not guaranteed to clear the lock. Please contact Relay Network to have it unlocked.
Q8. My organization’s firewall is blocking the CX Builder URL.
Please have your IT team unblock the following URLs: