Personalization via dynamic inputs play a pivotal role in enhancing user engagement and fostering meaningful interactions within your application's feed. By tailoring messages to individual users, you can deliver relevant content, drive user retention, and ultimately improve overall user satisfaction. To achieve this level of personalization, you can leverage various data fields available within our SaaS platform. Currently, the following fields are utilized for personalizing feed messages:
account_ Fields: These fields consist of standard user account attributes pulled directly from the user record. These attributes typically include essential user information such as name, email address, home address, and any other pertinent details stored in the user profile. Incorporating account fields allows you to personalize messages based on each user's unique characteristics and preferences.
input_ Fields: Input fields encompass values provided at the time of message triggering. These dynamic variables provided access to more variable data associated with a specific user. Examples of input fields may include transaction amounts, product names, event dates, or any other relevant details pertinent to the triggered message. Leveraging input fields enables you to deliver timely and contextually relevant messages tailored to users' current activities or behaviors. Dynamic input_ values can be provided with the RelayOnboardAction and RelayMessageAction flow actions.
ext_ Fields: Ext fields represent custom client-provided data attributes that extend the Relay default user profile and are provided during the onboarding process. These custom attributes offer additional insights into user preferences, behaviors, or any other specialized information tailored to your unique business requirements. Extending the default user profile with ext_ fields enables highly targeted personalization. Dynamic ext_ field data can only be passed via the RelayOnboardAction flow action.
By leveraging account_, input_, and ext_ fields effectively, you can deliver highly targeted and personalized experiences that resonate with your users, fostering lasting relationships and driving business growth.
Example Message Template
Example Message Template
Hi @{account_firstname}, thank you for being a valued customer since @{ext_MemberSinceDate}.
We have shipped your order @{input_OrderNumber} and it is expected to be delivered on @{input_OrderDeliveryDate}
@{account_name} - Pulls the first name from the user’s record stored in Relay.
@{ext_MemberSinceDate} - This value, provided during onboarding, will be pulled from the user’s record stored in Relay
@{input_OrderNumber}, @{input_OrderDelvieryDate} - This value must have been provided with the triggered message. Its value is stored with the message itself and not in the Relay user record.
There are two ways to provide dynamic input values to Relay from Salesforce. The first is by providing a list of record field names and allowing the Relay action to retrieve the values. The second option is to provide both the dynamic input field name and its value. Both will be described in more detail below.
NOTE
The RelayOnboadingAction accepts both options listed below. This provides you with the most flexibility.
The RelayMessagingAction currently only supports the first option of providing the field names only.
Dynamic Inputs as a list of Field Name
This is the easiest way to pass dynamic input values to Relay. In this scenario you provide just the record field names and let Relay retrieve the values during the Onboarding or Message action.
IMPORTANT
For this use case, all of the fields must be from the same record. If you need to pull dynamic inputs from multiple different records then follow the instructions in the next section.
Create a new flow resource collection to hold the list of field names.
Resource Type set to variable
.Data Type set to Text.
Ensure the Allow multiple values (collection) option is checked.
Add an Assignment element to your flow.
Edit the Assignment element and one or more field names to the collection. Make sure you are using the actual field name and not its label.
Use the resource in the RelayOnboardingAction or the RelayMessagingAction
Example 1 - Dynamic input names only
Suppose the contact object triggered the flow, and you would like to pass the Title field to the RelayMessagingAction. Additionally, you have modified the contact object and added a custom field called MemberSinceDate__c that you also would like to include.
We have created a flow resource called DynamicInputNames as described in the above procedure. Next, we add the field names to the resource via an assignment element.
IMPORTANT
In the below assignment we are simply adding the field names not their actual values. The Relay action will extract the values.
✅ Title
⛔ $Record > Title

Dynamic Inputs as Name and Value Pairs
While this option provides more flexibility, it is slightly more complicated and requires multiple flow resources. In this scenario you will be providing both the dynamic input name and its value. By providing the value, it allows you to pull data from any record in the flow, flow resource, or even provide a hard-coded value.
Create Resources to Each Dynamic Input Definition
Create a new flow resource for each dynamic input you plan to use
Set the Resource Type to Variable
Fill in an appropriate value for API Name and Description
Set the Data Type to Apex-Defined
Leave Allow multiple values (collection) unchecked
Set the Apex Class to RelayDynamicInput
Leave Available for input and Available for output unchecked
Save and repeat the above steps for as many dynamic inputs are required
Create a Resource Collection to Hold all the Definitions
Create a new flow resource collection to hold the list of dynamic input resources you created above
Set the Resource Type to Variable
Fill in appropriate values for API Name and Description
Set the Data Type to Apex-Defined
Leave Allow multiple values (collection) checked
Set the Apex Class to RelayDynamicInput
Leave Available for input and Available for output unchecked
Save
Create Flow Assignments to Populate the Resources
Add a flow assignment element to your workspace
Edit the flow assignment
Add each resource, created in Step 1 (Create Resources to Hold the Dynamic Inputs), to the resources created in step 2 above (Create Resources to Hold the Dynamic Inputs)
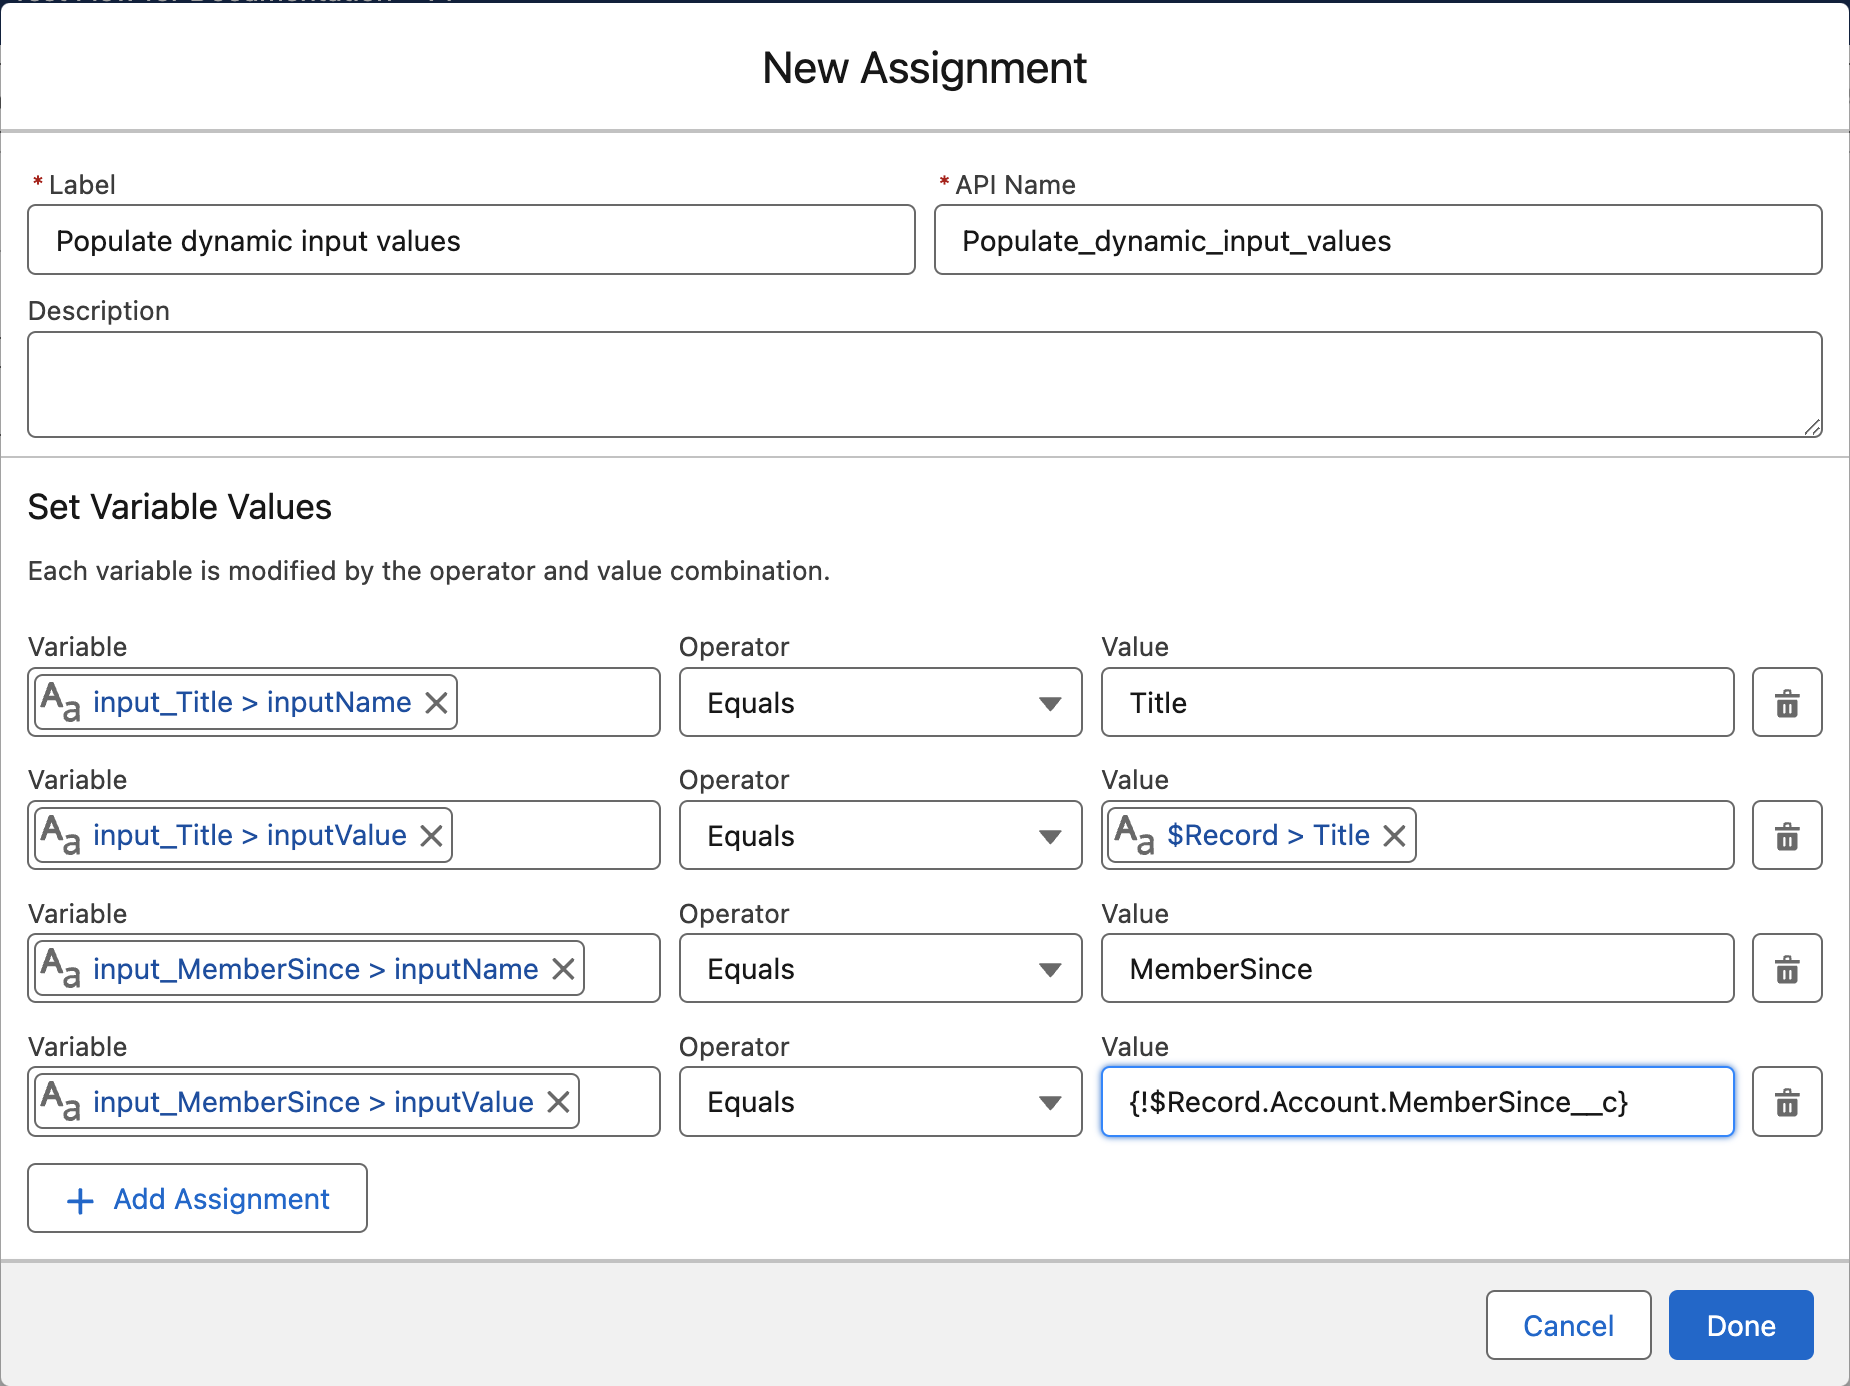
Example 2 - Dynamic Input Names and Values
Step 1.
Create a RelayDynamicInput resource for each dynamic input.
Create a resource as a collection of RelayDynamicInput
Step 2.
Assign the dynamic input_ names and values to each resource. This can be done with a single flow logic assignment.
Step 3.
Add each dynamic input resource to the collection.
Step 4.
Use the RelayDynamicInput collection resource in the RelayOnboardingAction flow action.