This example should be used as a reference to understand basic concepts and ideas on integrating with Relay Network. It should not be taken literally as this is how integration to Relay must be done. You should replace your record types, field names, business logic, etc. with those that match your business process and setup.
Example 1 Goals
Whenever a Person Account is created or updated perform the following:
Check a field to see if the account has already been onboarded to Relay
If no, then call the Relay onboarding action, with a welcome trigger
If yes, then call the Relay onboarding action, without a message trigger, to update the user profile in Relay
NOTE
Using an asynchronous path is always a good idea when integrating with Relay. This ensures all of your primary business logic is executed as fast as possible and prevents any issues in the Relay flow from effecting your records from being inserted or updated.
Assumptions
The user’s data is stored in a Person Account record
The Person Account ID field will be used for the Relay CCID.
We have created a custom checkbox field, HasBeenOnboardedToRelay__c, on the person account. This field is used to determine if the user has already been onboarded to Relay.
A Relay Welcome experience will be triggered for new users only.
Flow Resources
Resource Name | Type | Description |
|---|---|---|
OnboardingRequest |
| This resource will be populated with the details about the user to be onboarded. |
ext_AgentName |
| In this example, we will be passing the Agent’s name (assigned to the person account) as an dynamic ext_ field to Relay. See Relay Dynamic Inputs |
CollectionExtFields |
| When passing dynamic ext_ fields to Relay, all of the fields must be grouped into a collection. See Relay Dynamic Inputs |
Flow
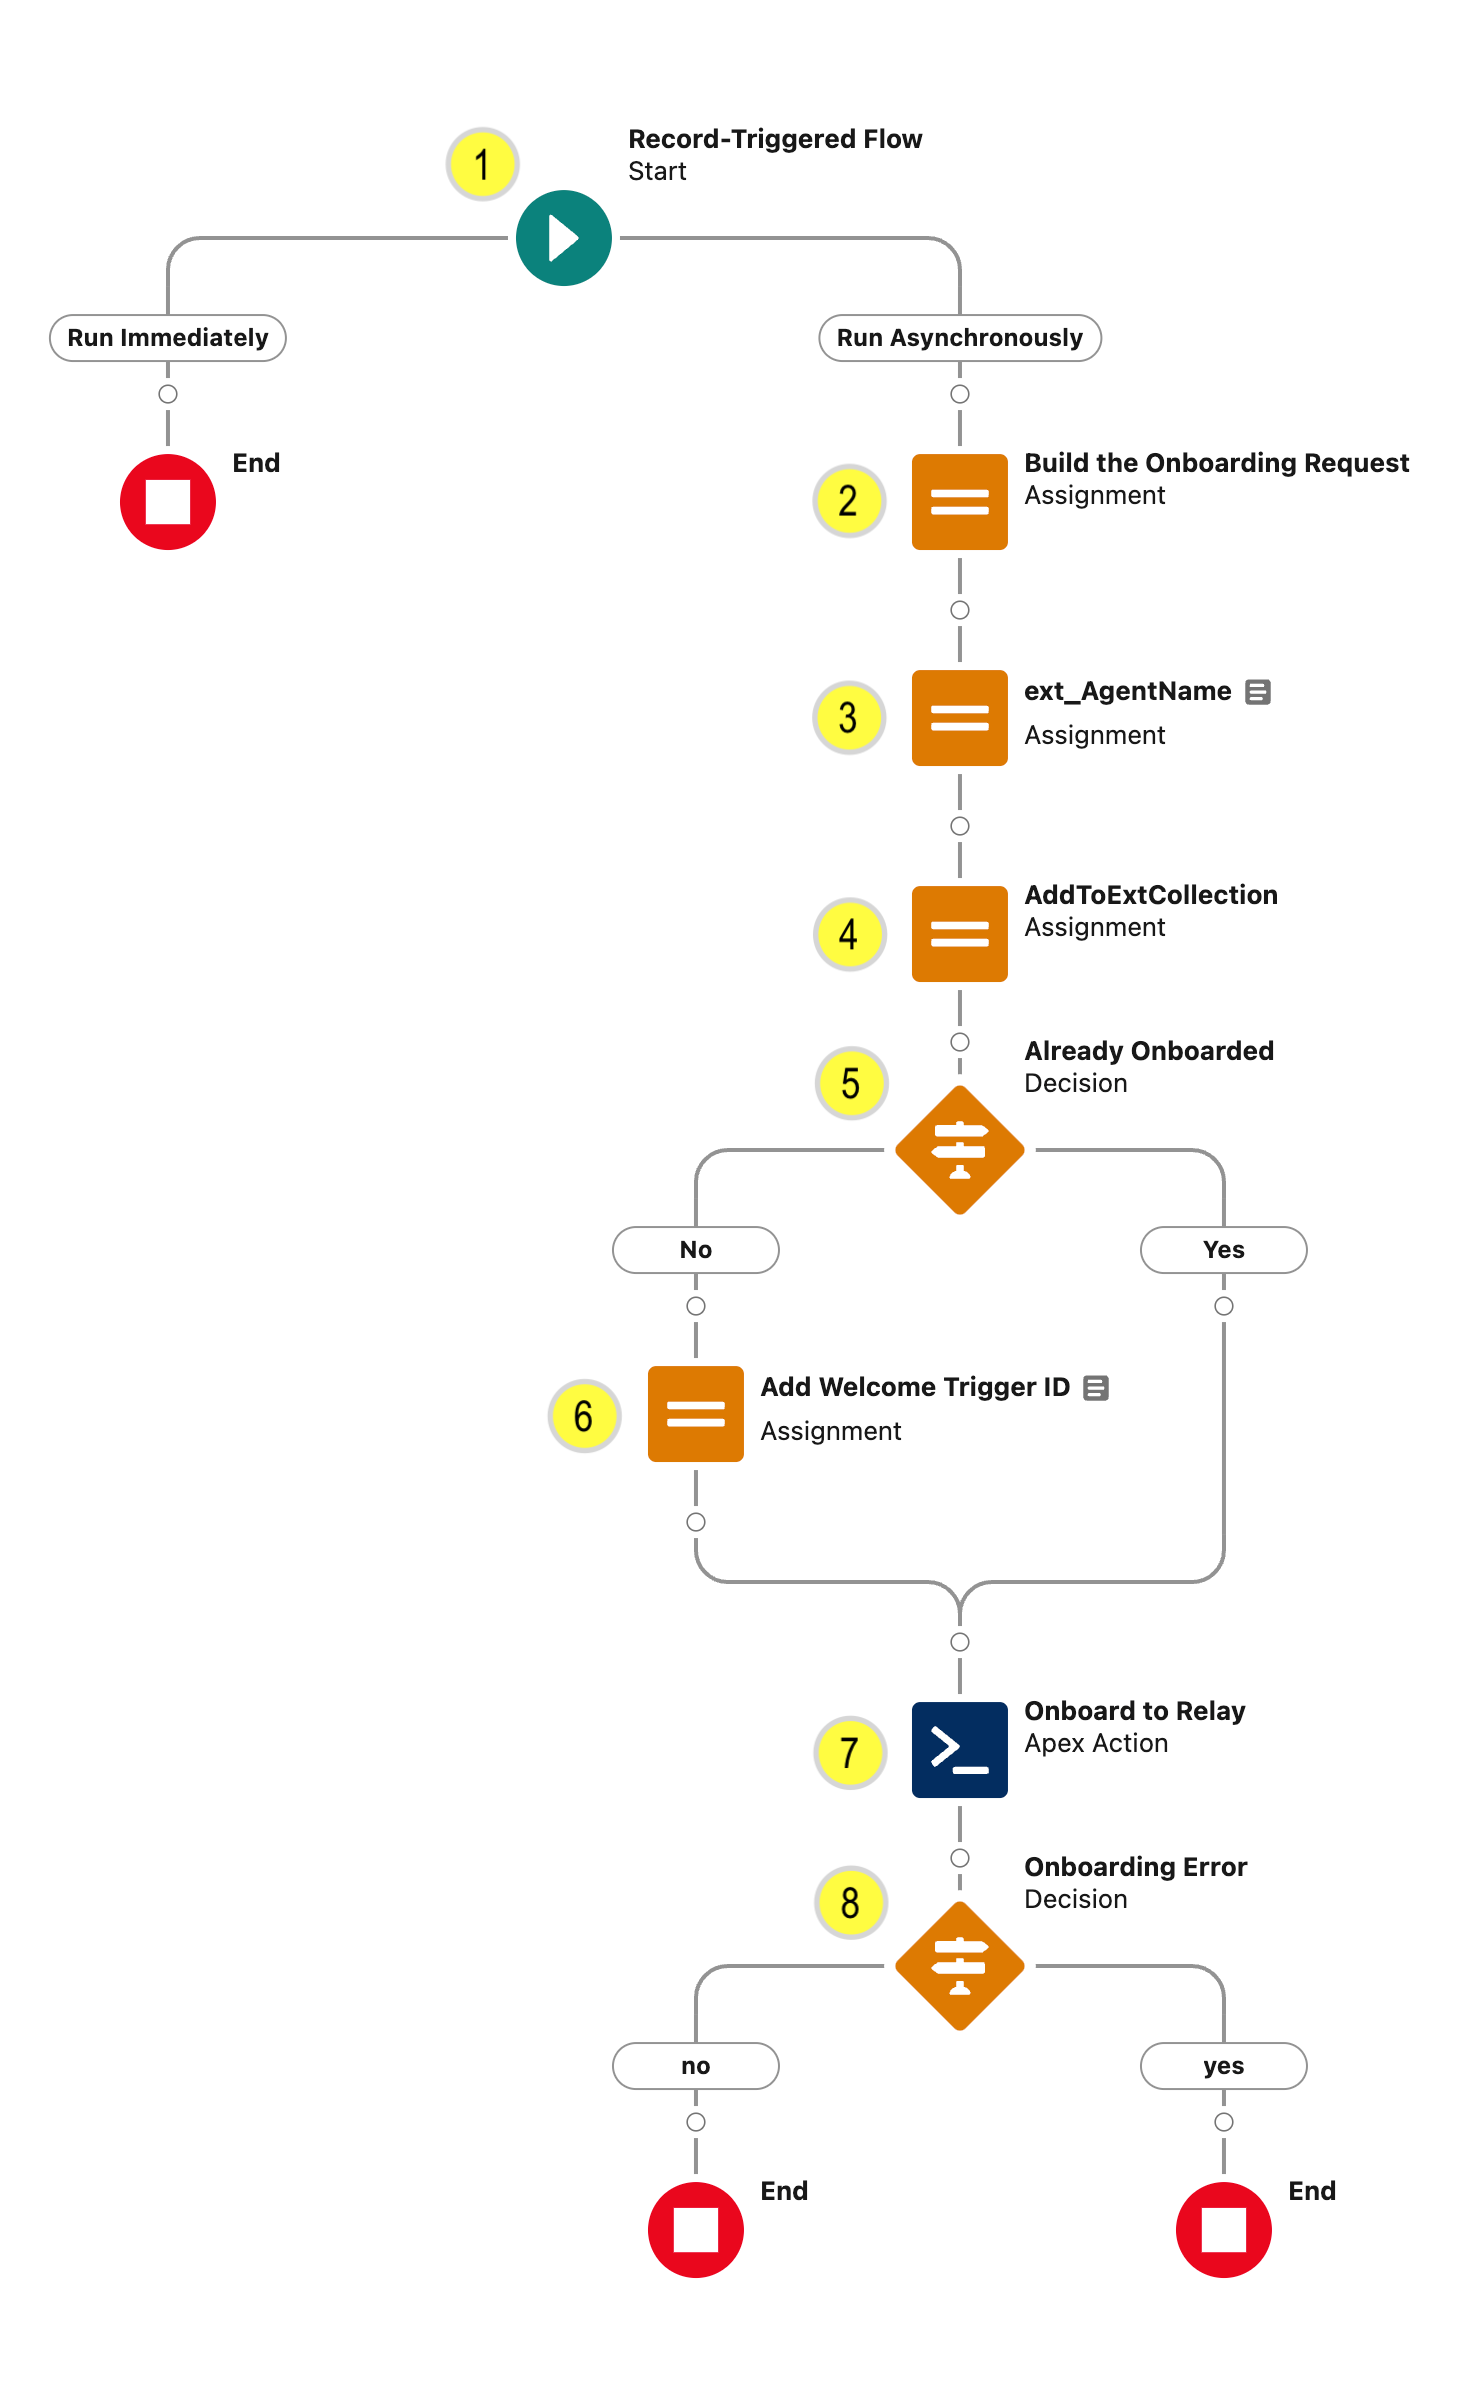
Flow Logic
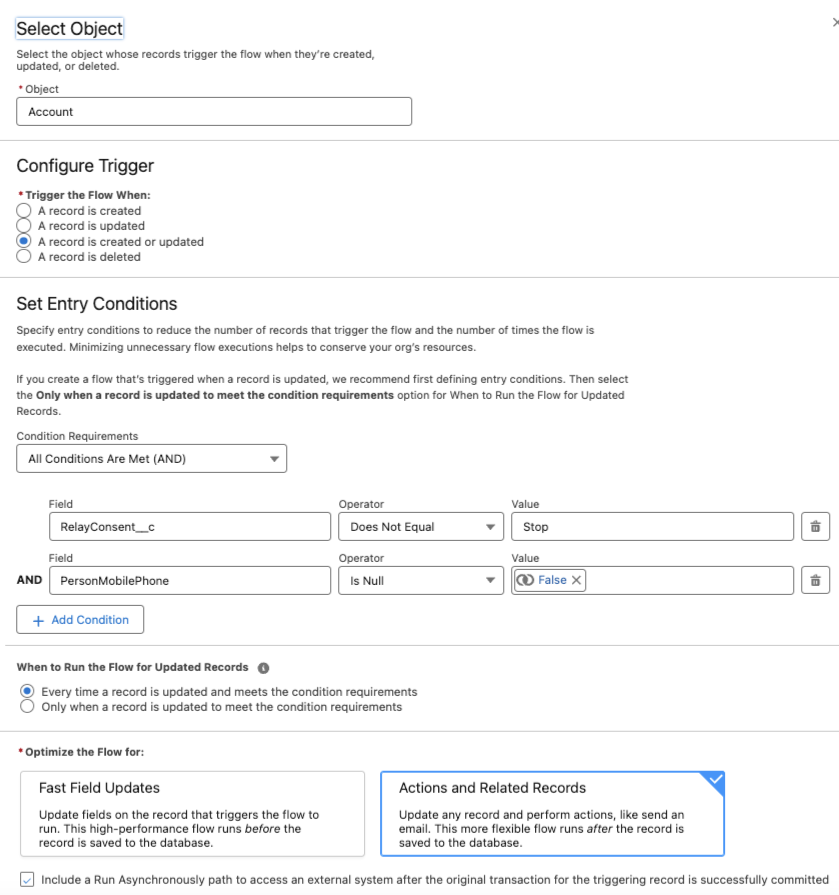
(1) Configure the Start Element
Create a Record-Triggered Flow on the Account record
Set Configure Trigger as a record is created or updated
Set any specific Entry Conditions. For this example we have included the following conditions:
Ensure the SMS TCPA consent value is not Stop. For this example consent is stored in the custom RelayConsent__c field.
Ensure the PersonMobilePhone field is not null.
Enable the Run Asynchronously path
(2) Populate the Onboarding Request Resource
Add an Assignment element to populate our OnboardingRequest resource
Set the values for the OnboardingRequest resource as follows:
{!OnboardingRequest.ccid} → {!$Record.RelayCCID__c}
{!OnboardingRequest.mobilePhone} → {!$Record.PersonMobilePhone}
{!OnboardingRequest.consent} → {!$Record.RelayConsent__c}
{!OnboardingRequest.firstName} → {!$Record.FirstName}
We leave the Trigger ID field empty. If this is a new user, then the Trigger ID will be populated in the decision branch.
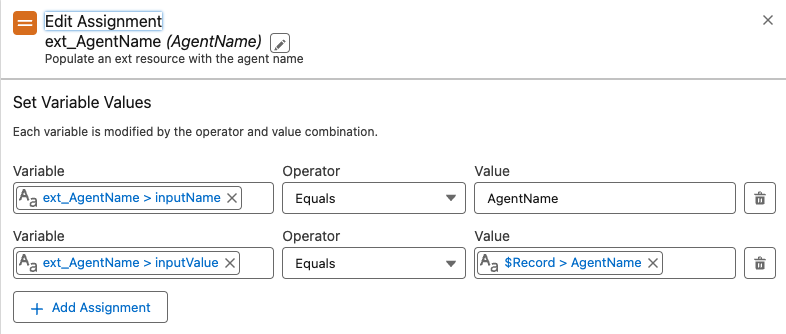
(3) Populate the ext_ field data
We will be adding a custom ext_ field to the Relay onboarding request. This ext_ field will contain the name of the agent assigned to the Person Account and will be added to the user record in the Relay platform.
Add and Assignment element
{!ext_AgentName.inputName} → Agent Name
{!ext_AgentName.inputValue} → {!$Record.AgentName__c}
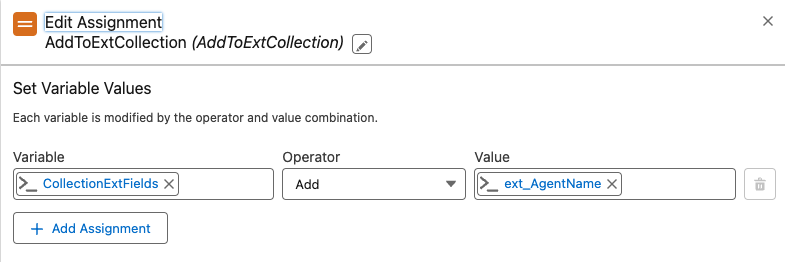
(4) Add the ext_ Resource to the Collection
Ext resources are passed to the Relay Onboarding Action as a collection. Therefore, for each ext_ field/value pair we want to send to Relay, we have to add it to a collection.
Add and an Assignment element
Add the ext_AgentName (populated in step 3). resource to the collection of ext_ values CollectionExtValues.
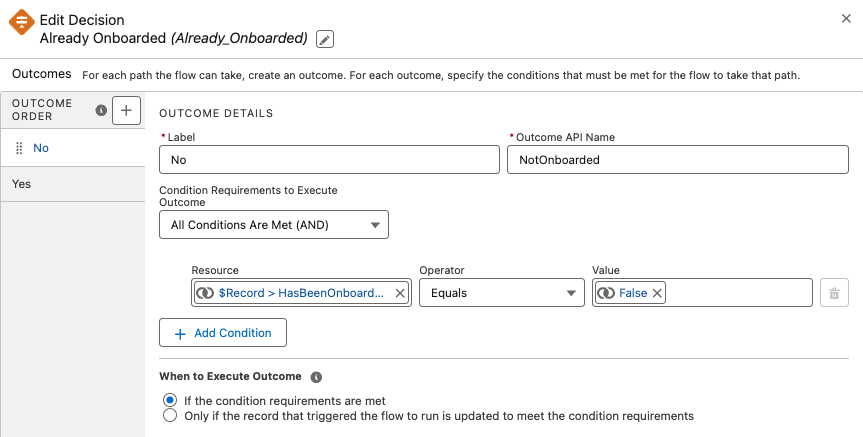
(5) Check if the User has Already Been Onboarded
Add a Decision element
Check the custom HasBeenOnboardedToRelay__c field to see if the user has already been onboarded to Relay.
If this user has not been onboarded to Relay, then the No branch will add a Welcome trigger to the onboarding request. If the user was previously onboarded, then the Trigger ID will remain blank and we will only be updating the user’s information in Relay.
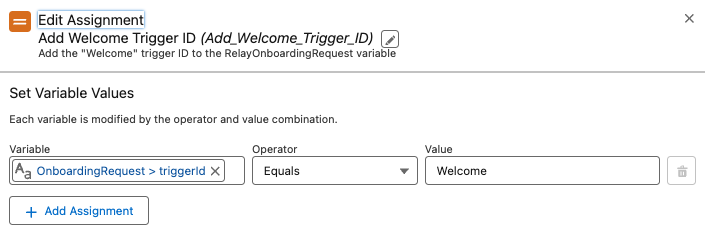
(6) No Outcome - Add Welcome Trigger Id
If the user has not been previously onboarded to Relay, we add a welcome trigger ID to the onboarding request. In this example the Relay trigger ID we are using is: Welcome.
Add an Assignment element
Set {!OnboardingRequest.triggerId} → Equals → Welcome
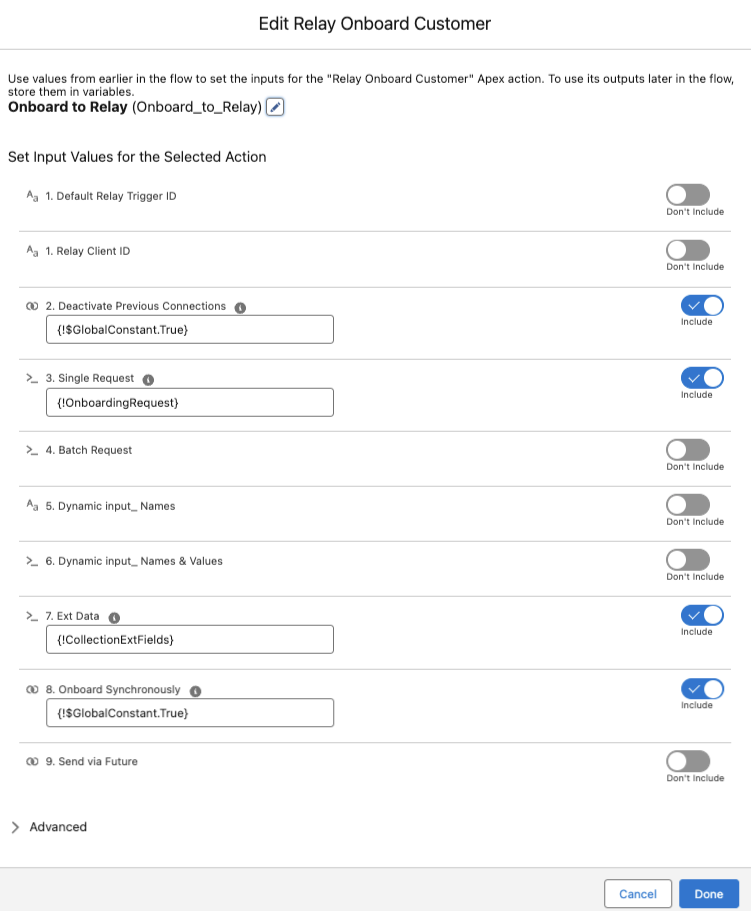
(7) Onboard User to Relay
Leverage the Relay Onboard Customer flow action to callout to Relay and onboard the user.
Add the Relay Onboard Customer action element
Set the Deactivate Previous Connections value to {!$GlobalConstant.True}
Set the Single Request value to the OnboardingRequest resource we populated in step (2)
Set the Ext Data input value to {!CollectionExtFields} resource
Set the Onboard Synchronously value to {!$GlobalConstant.True}.
Leave the Send via Future off. The flow is already running in a Future by way of the asynchronous path.

(8) Check the Onboarding Callout Status
When integrating to external systems with callouts, it is always a good practice to check the return status code to ensure the callout was successful. For the Relay Onboard Customer action as responseCode of 200 or 204 means success. If you receive a 202 response code, then your did not property set the input value for the Onboard Synchronously property.
Add a Decision element
Set the Condition Requirements to Execute Outcome to Any Condition is Met (OR)
Add the following conditions:
{!Onboard_to_Relay.responseCode} → Equals → 200
{!Onboard_to_Relay.responseCode} → Equals → 204
If there was an error during the onboarding action, you can add any action as required by your business process. Some examples are:
Sending an Email Alert
Sending a Slack Message
Writing the error to another object
