Salesforce is deprecating Connected Apps
Salesforce Connected Apps are now off-by-default and are being phased out in favor of External Client Apps (ECA). If your org's security review has flagged the Legacy OAuth Username-Password flow, skip to [Migrating to an External Client App (ECA)] below.
Overview
A Salesforce Connected App configuration requires setup on the Relay side (the push API) and the Salesforce side (receiver).
Configure a Relay Push API within the CXB Portal
A certification will be created and downloaded. This certification will be required when configuring the Connected App in Salesforce
Configure the Salesforce side— choose ONE of the following:
Edit the Push API configuration (from step 1) in the Relay CXB
Update the Salesforce Consume Key with the value (from step 2).
1. Relay - Configure the Push API in CX Builder
IMPORTANT
If you do not see the API Management module on the left menu, please check that you have either Client Admin or Client User with Integration Permissions in the System.
Login to the Relay CXB Portal
Click on API Management in the left menu column.
Click on the Push API Integration tab. This is the “home page” of the Push API Integration UI, where you will see a list of existing integrations - if any exist.
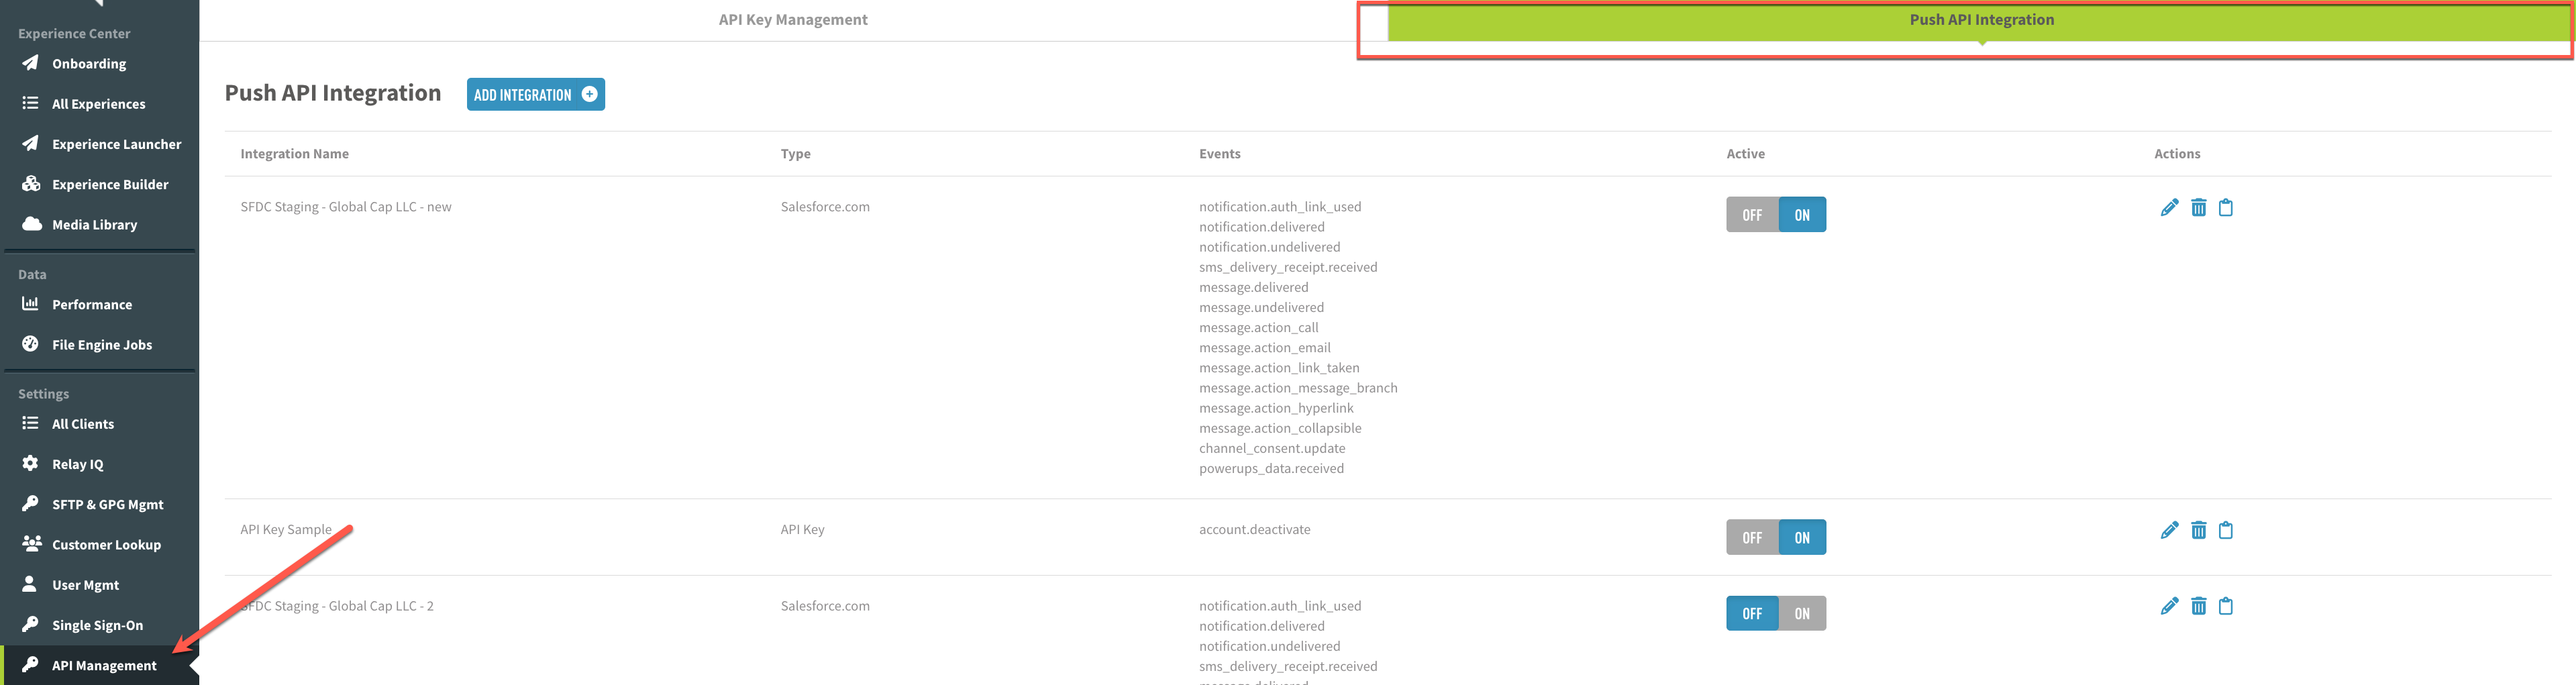
Click the “ADD INTEGRATION” button. A modal will pop up with a dropdown menu.
If you are installing the managed package from the App exchange, choose Salesforce App Exchange Package. If your Relay CSM provided you a link to the unmanaged package, select Salesforce Unmanaged Package.
.png)
Fill out the configuration dialog:
Name: This is the name of the integration you are creating, and can be named whatever you wish to refer to it as.
Version: Select the version of this integration form with which you wish to integrate your client. The latest version is selected by default
Salesforce Username: This is the Salesforce username that the Client associated with the Connected App. For now, add any value in this box, later on in the setup you will obtain this value and we will update it
Salesforce Subdomain:
For Salesforce sandboxes, set the value to Test
For Salesforce production, developer orgs or personal accounts, set the value to:
Login - If your company uses the generic endpoint login.salesforce.com
My Domain - If your company's org runs on Hyperforce infrastructure, which requires a My Domain URL (if chosen, a field to enter the custom domain will appear)

Salesforce Consumer Key: This is the Salesforce Consumer Key of the Connected App Configuration. For now, add any value in this box, later on in the setup you will obtain this value and we will update it.
Event Set: This is the standard set of event types that will be inserted as records into the following objects: RelayEvents__c and RelayPowerups__c.
Download the Certificate: The certificate/cert (or
public_key) will appear after you click Activate. A modal will appear, click on You can download it here. If you need to access it after this modal is closed, the .crt file can be downloaded at any time when clicking on the edit icon setup, and locating the You can download it here at the bottom of the modal.Provide the downloaded public certificate to the Salesforce admin who is installing the Relay Package.
.png)
2. External Client App (ECA) setup
A Salesforce ECA configuration requires setup on the Relay side (the push API) and the Salesforce side (receiver) — the same two-sided pattern as the Connected App above.
Follow Salesforce's guide to create a local External Client App: Create a Local External Client App
Set up the ECA using the values below.
Update the Push API configuration in the Relay CXB Portal with the new Consumer Key (same as Section 3 above).
ECA Configuration
Set ECA Name to Relay Connected App.
Set API Name to Relay_Connected_App.
Set Contact Email to the email address that will receive any errors related to this Connected App.
OAuth Settings
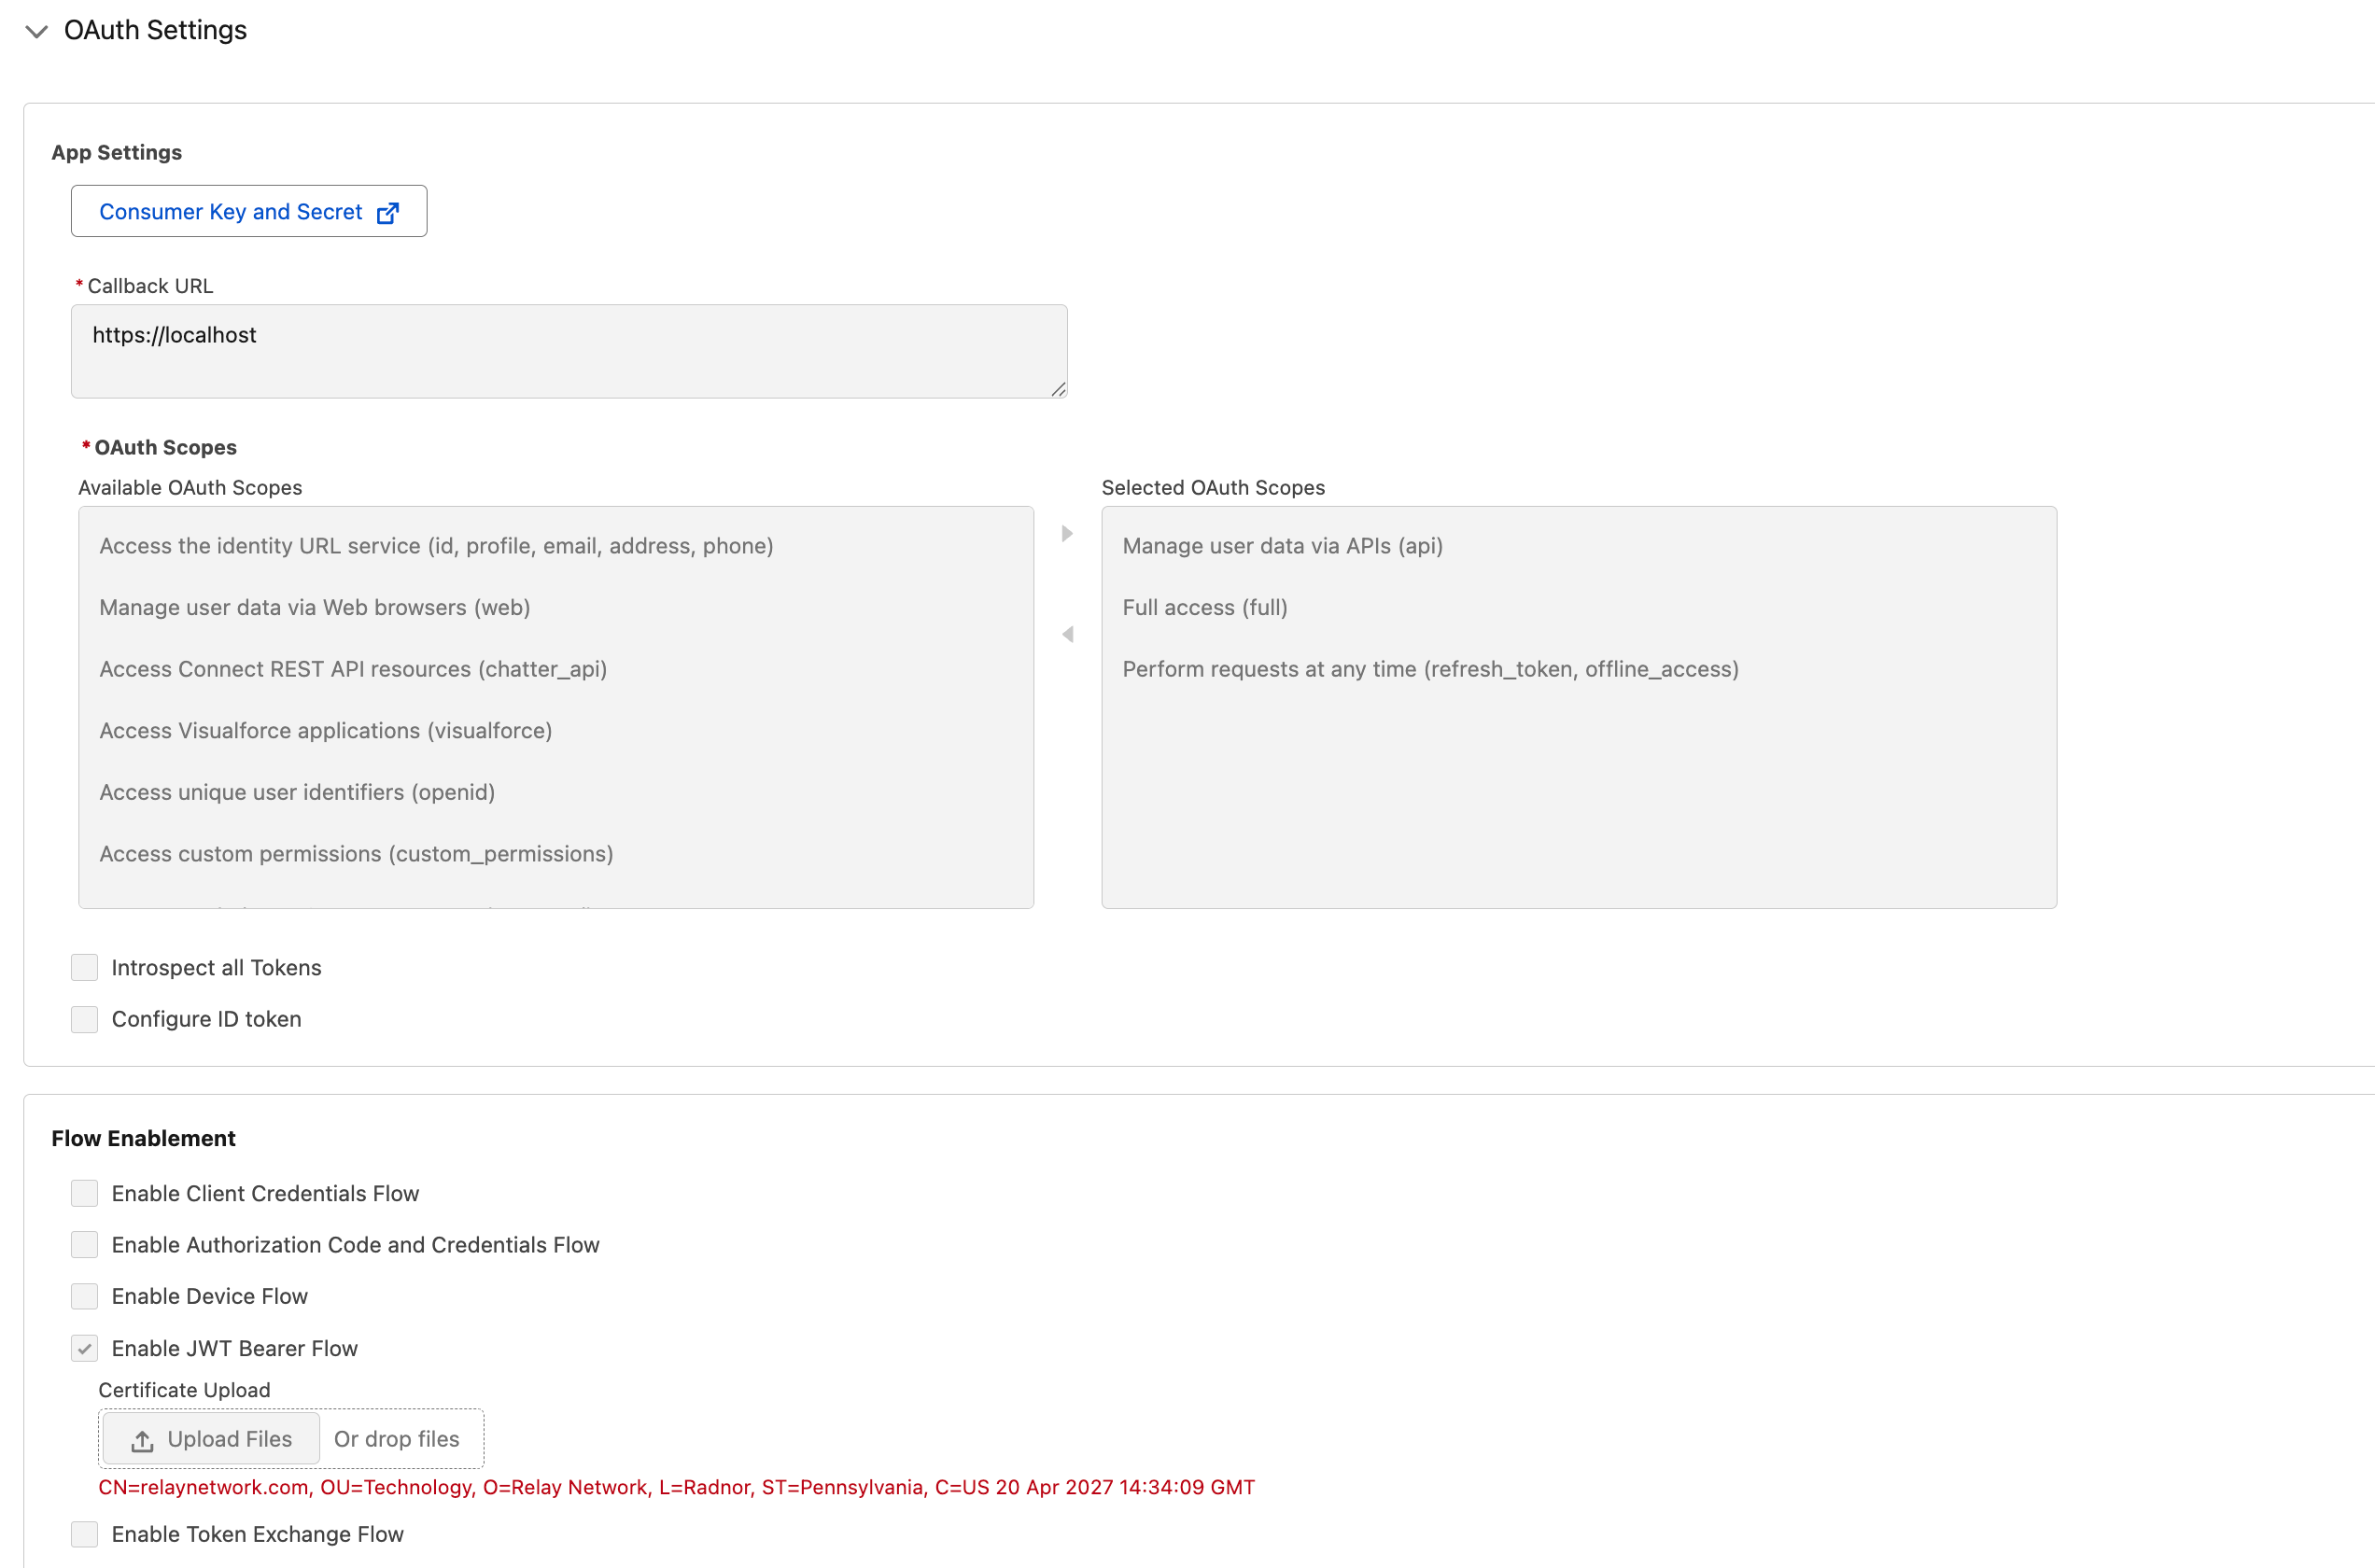
Figure A.
Set the Callback URL to https://localhost.
Under OAuth Scopes, move the following to Selected OAuth Scopes:
Manage user data via APIs (api)
Full access (full)
Perform requests at any time (refresh_token, offline_access)
Under Flow Enablement, check Enable JWT Bearer Flow and upload the certificate provided by your Relay Implementation Manager.
OAuth Security Configuration
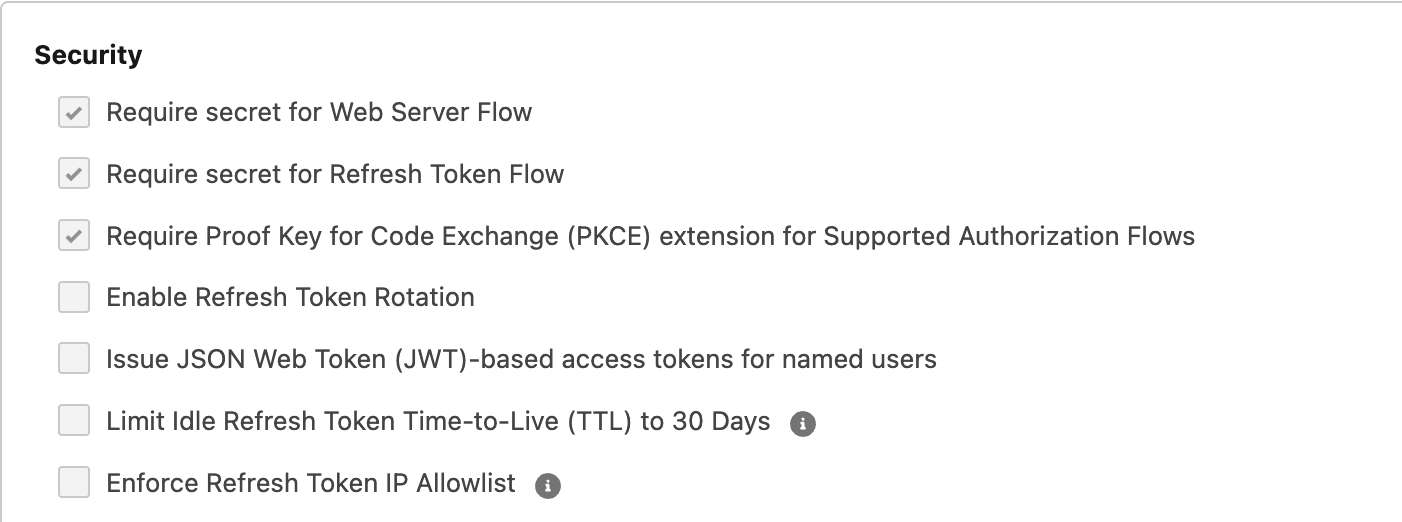
Figure B.
Check Require secret for Web Server Flow
Check Require secret for Refresh Token Flow
Check Require Proof Key for Code Exchange (PKCE) extension for Supported Authorization Flows
Leave all other settings at their default values, then click Save.
STOP
You need to add the Salesforce Username and Consumer Key of the ECA in CX Builder.
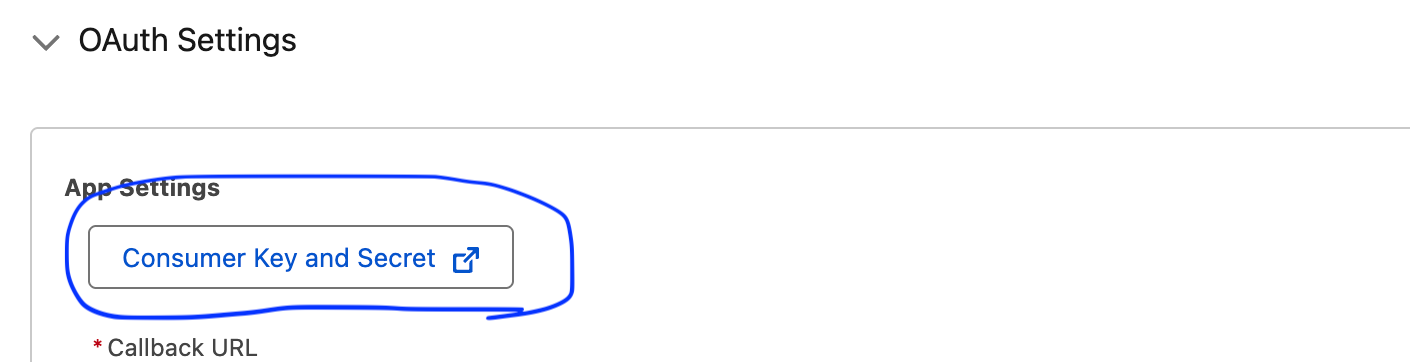
Under App Settings, click Consumer Key and Secret to reveal the values. Save the Consumer Key — it goes on the Relay Portal.
Figure C.
In CX Builder, edit the Push API connection and enter the Salesforce Username and Consumer Key.
Update the ECA Policies
App Policies:
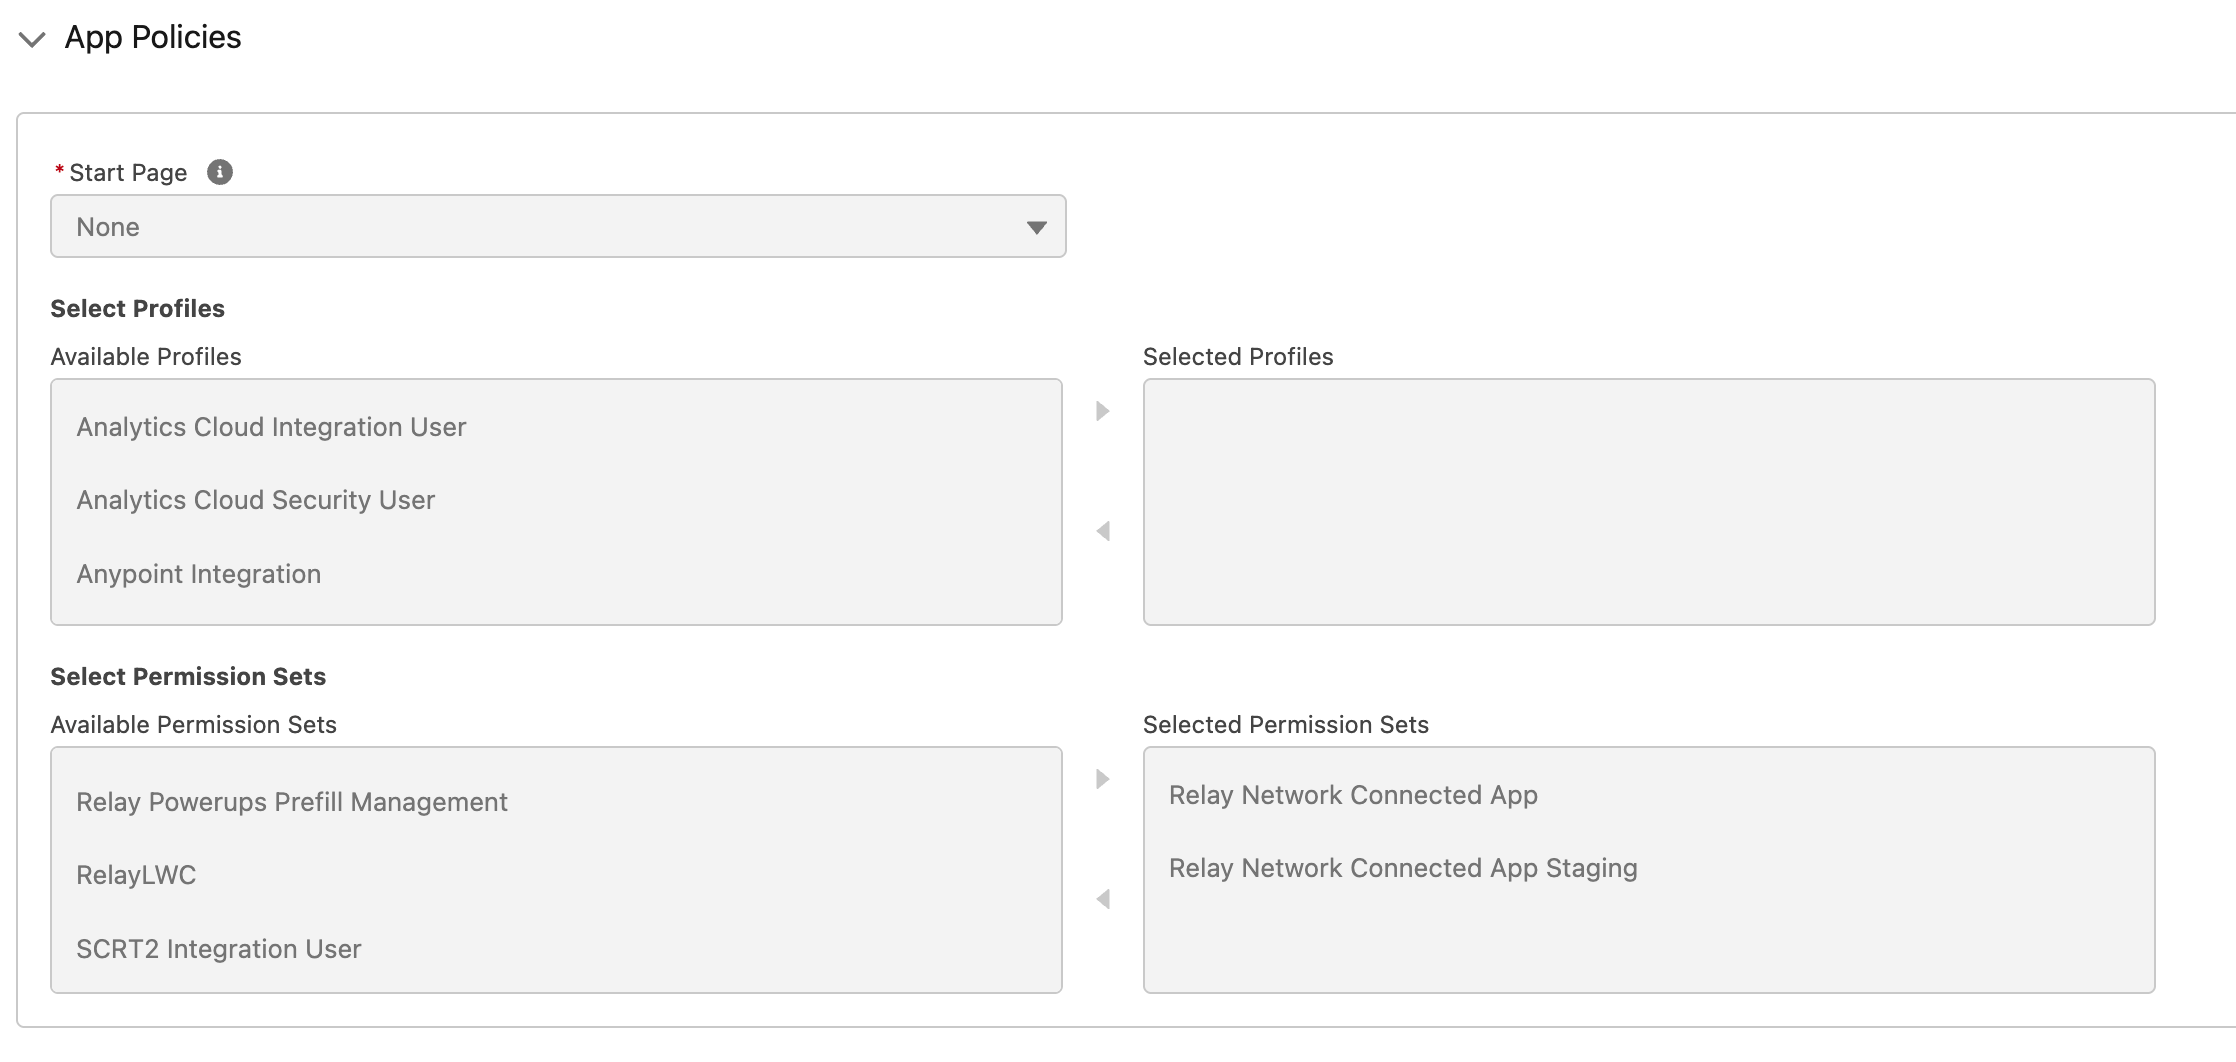
Figure D.
Under Select Permission Sets, move Relay Network Connected App and Relay Network Connected App Staging to Selected Permission Sets.
Click Save.
OAuth Policies:
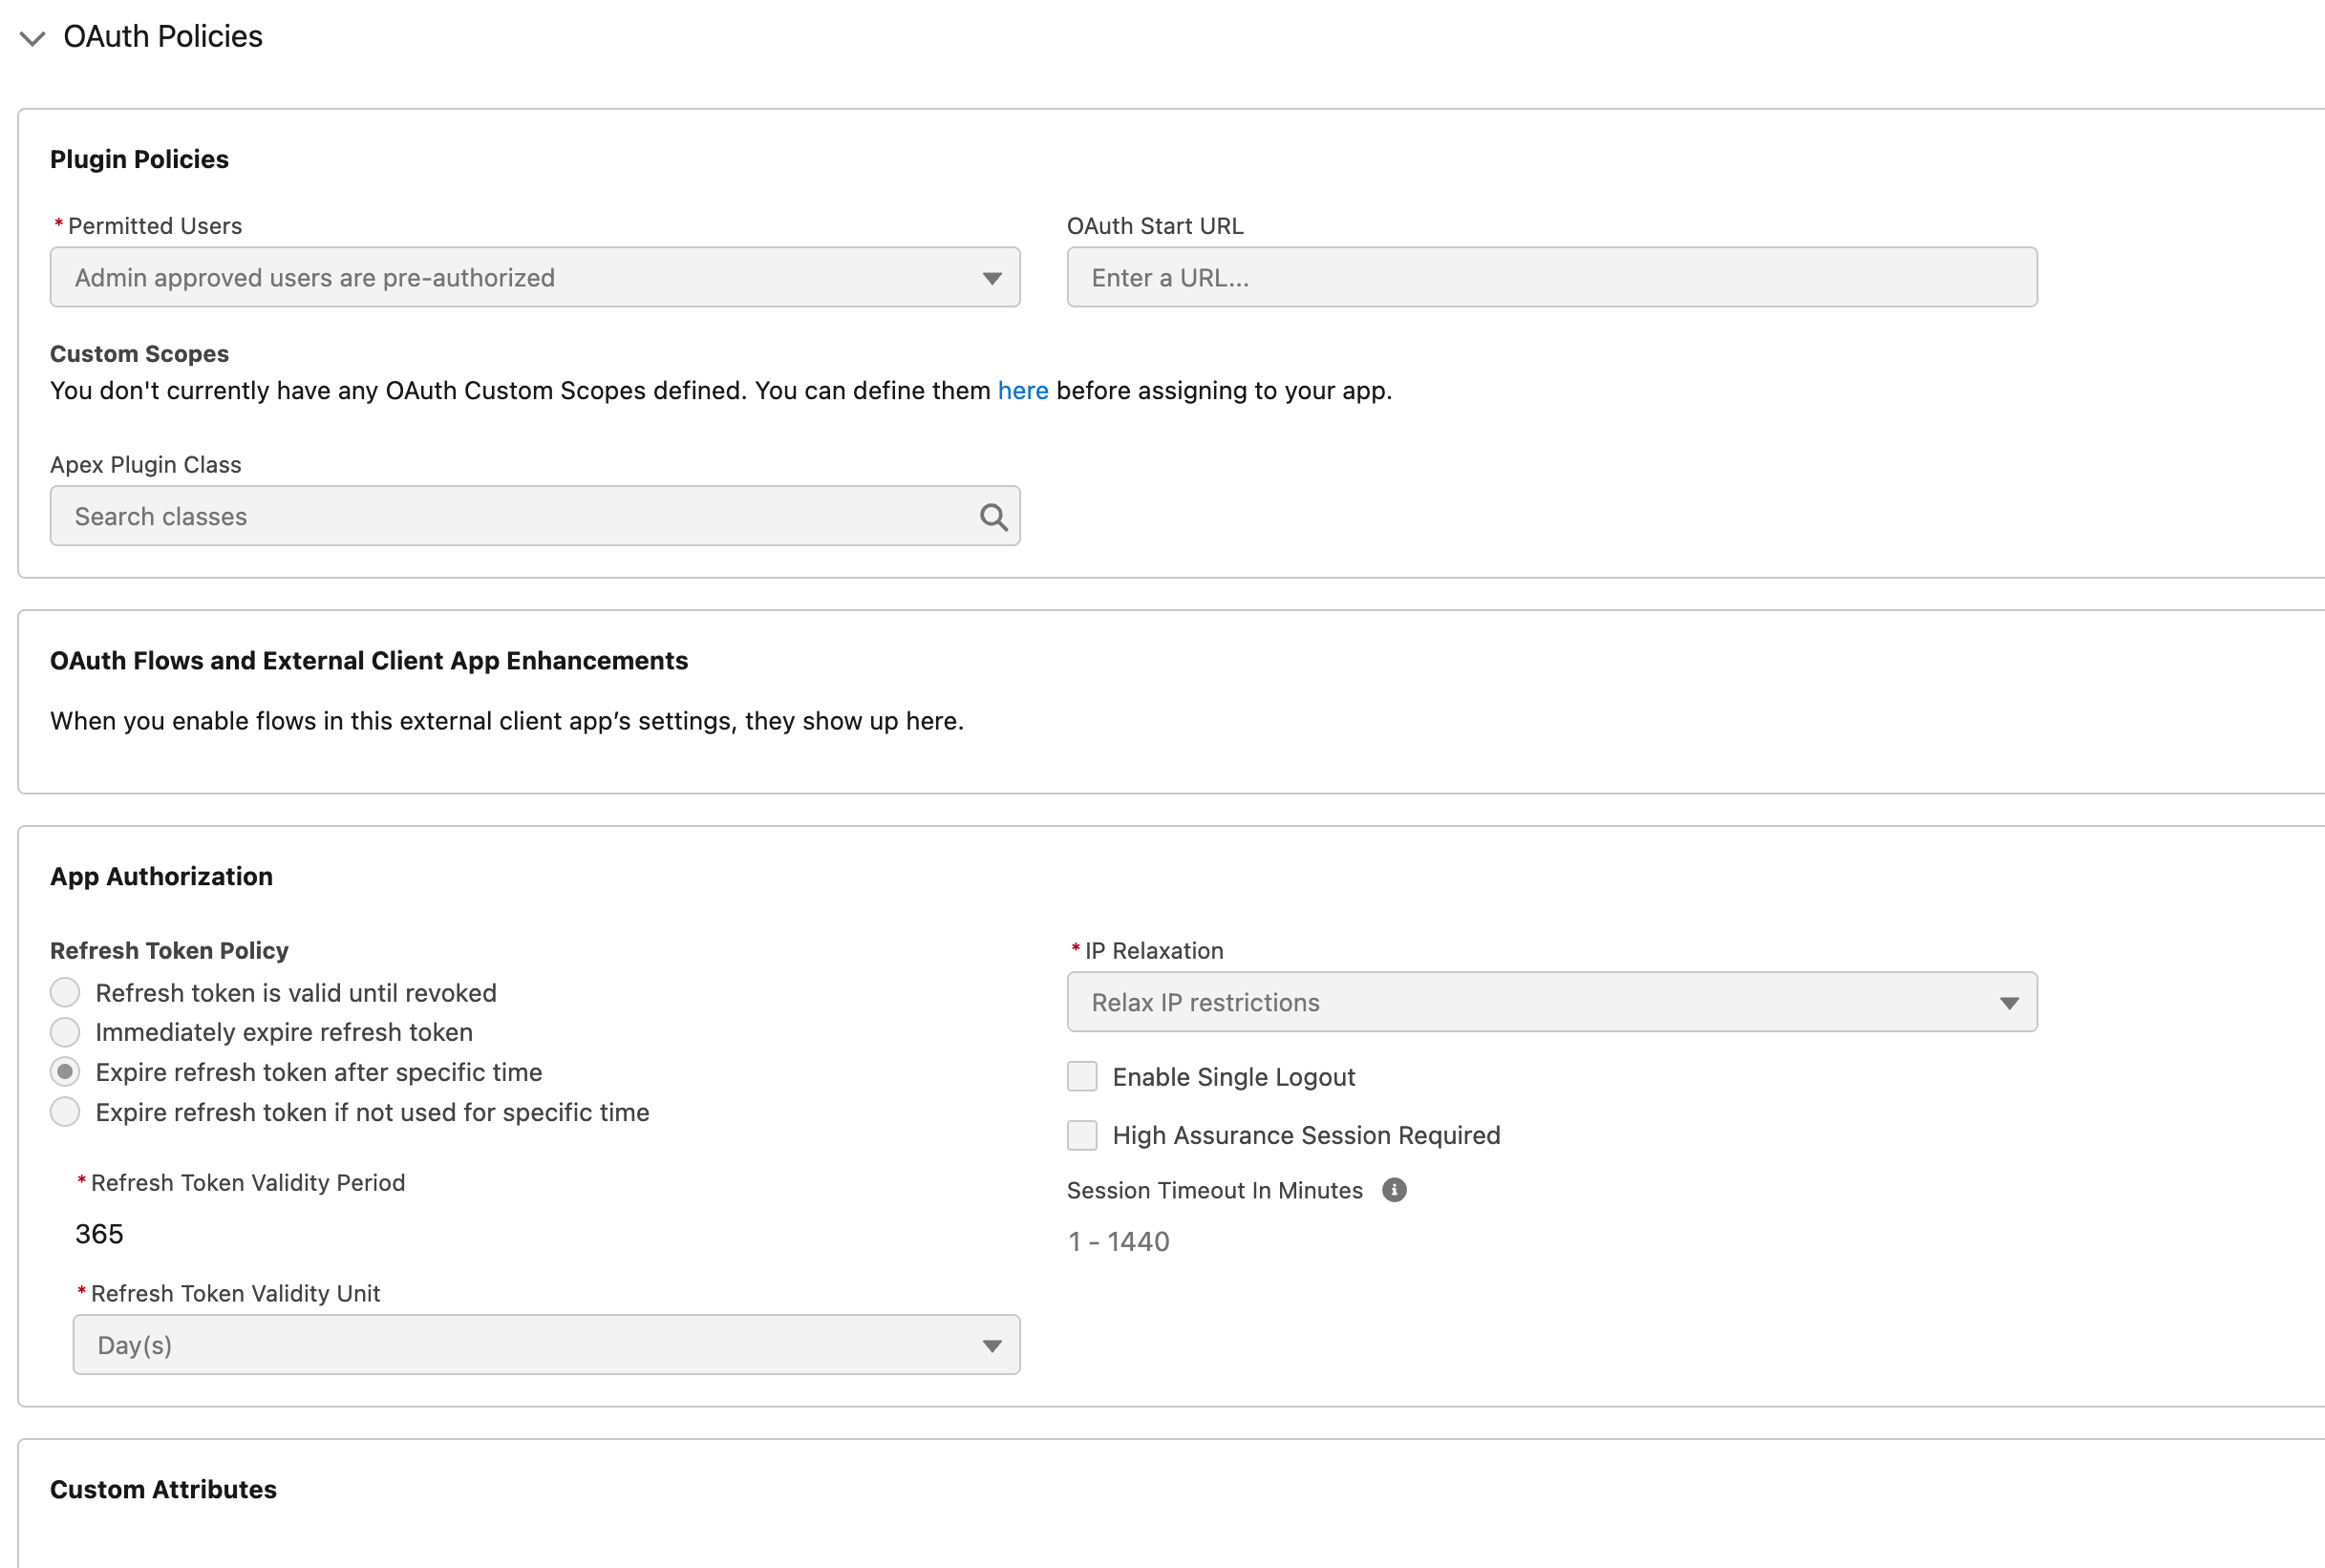
Figure E.
Set Permitted Users to Admin approved users are pre-authorized.
Set IP Relaxation to Relax IP Restrictions.
Leave all other settings (including the 365-day Refresh Token Policy) at their defaults, then click Save.
You should now have a properly configured Relay External Client App, ready for the Consumer Key to be added to the Push API configuration in Section 3 above.
4. Salesforce - Create the Relay Connected App (Legacy)
Legacy Path
This section applies to orgs that have not yet migrated to an External Client App. New installs should use Section 2 — External Client App (ECA) instead.
The Connected App allows Relay Network to insert event data, occurring within the Relay Network, into your Salesforce org. Based on the Relay event type, a record will be inserted into one of the two following objects: RelayEvents__c or RelayPowerups__c.
IMPORTANT
If a setting is not specifically called out in the the below article, leave it set to the default value.
As an admin, login to your Salesforce org.
Access your org’s Setup page.
Navigate to PLATFORM TOOLS → Apps → App Manager
Click the New Connected App button
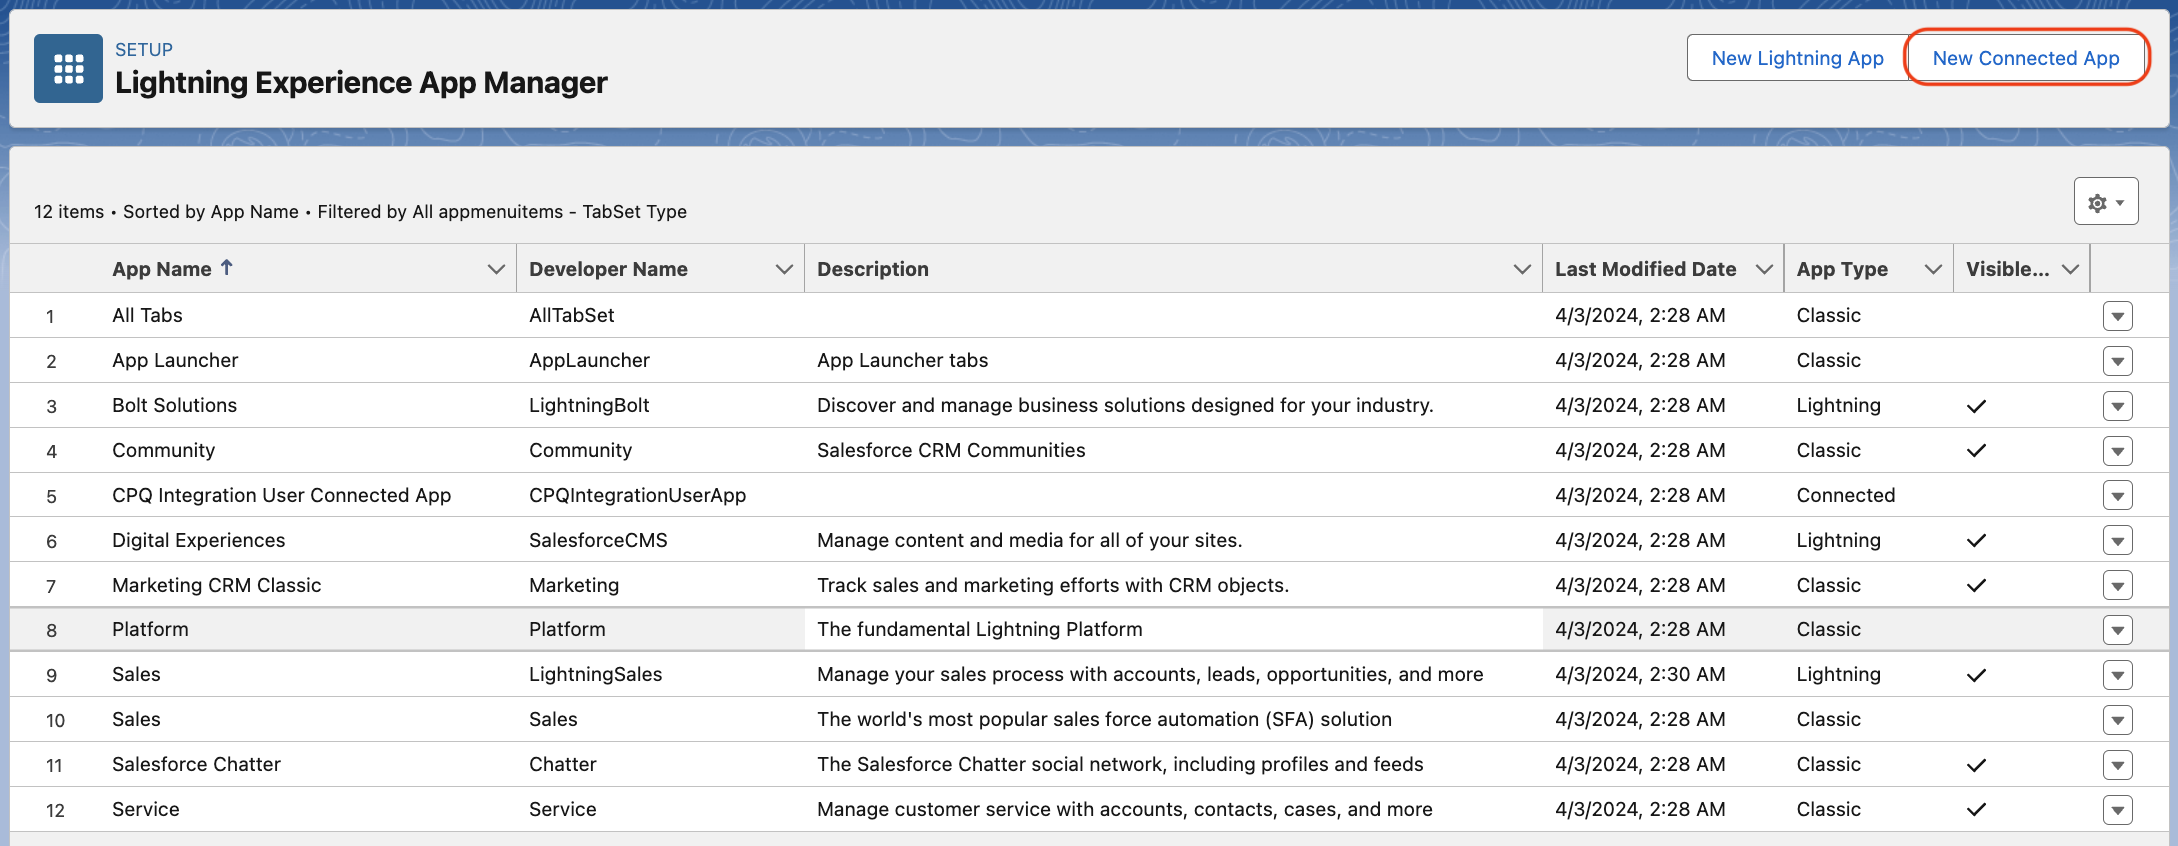
Figure 1.
Fill out the Managed Connect App as outlined below
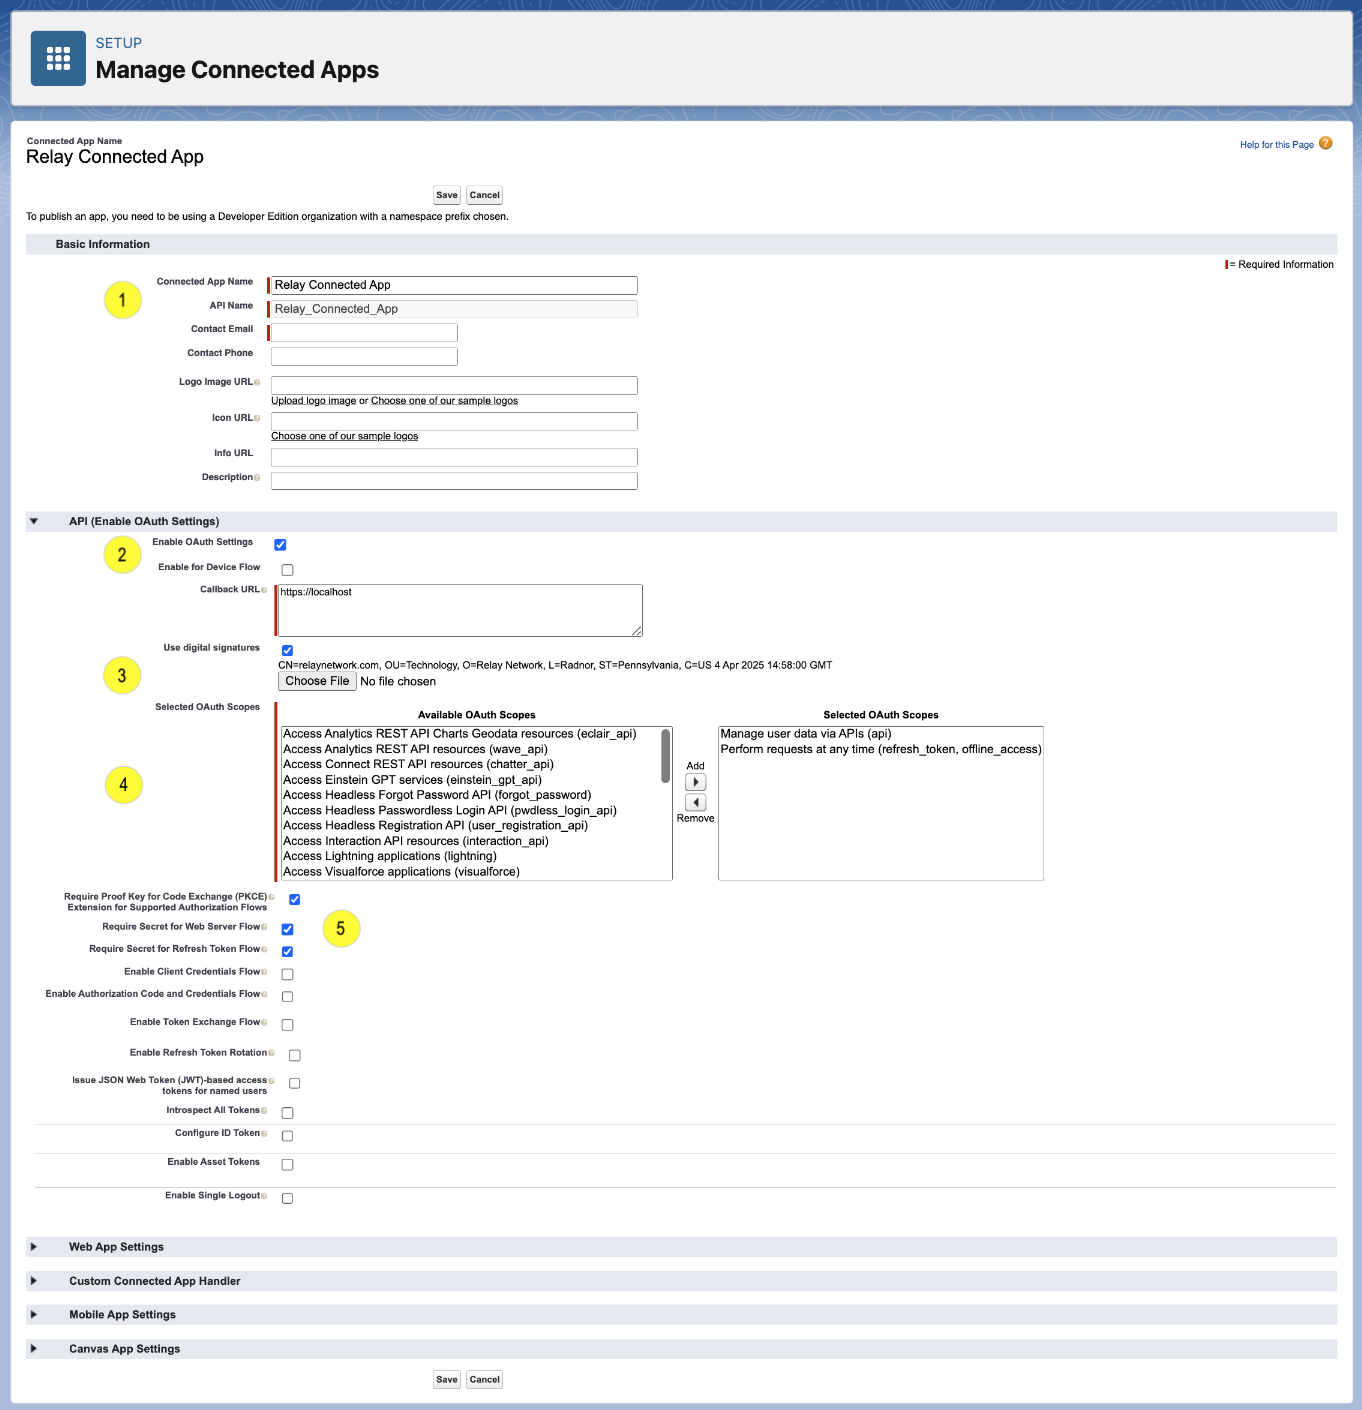
Figure 2.
Basic Information (1)
Set Connected App Name to Relay Connected App.
Set API Name to Relay_Connected_App.
Set Contact Email to the email address that will receive and errors related to this Connected App.
API (Enable OAuth Settings)
Check Enable OAuth Setting (2)
Uncheck Enable for Device Flow
Because this connected app is for connecting to the Relay system, no login user interface is required. Therefore, you can set the Callback URL to https://localhost
Check Use Digital Signatures (3)
Click the Choose File button. Select the certificate file that was provided to you by your Relay Implementation Manager.
Move the following to the Selected OAuth Scopes (4)
Manage User Data via APIs (api)
Perform requests at any time (refresh token, offline access)
Check the following options (5)
Require Proof Key for Code Exchanges (PKCE). Extension for Supported Authorizer Flows
Require Secret for Web Server Flows
Require Secret for Refresh Token Flows
Click Save
You should receive a message that it can take up to 10 mins for changes to take effect. Click Continue.
STOP
You need to add the Connected App Username and Consumer Key of the Connected App in CX Builder.
Click the Manage Consumer Details button. This should open a new tab in your browser.
In CX Builder, edit the Push API connection you created in the first step on this page, and add in the appropriate details.
Return to the original browser tab with the Managed Connected App settings you just created.
Update the Connected App Policies
You should still be on the Connected App settings page, so click the Manage button. If you are not on the Relay Connected App settings page follow the below steps:
From setup, navigate back to PLATFORM TOOLS → Apps → App Manager
Locate the Relay Connected App you just created
Click the drown down arrow and select Manage
Click the Edit Policies button
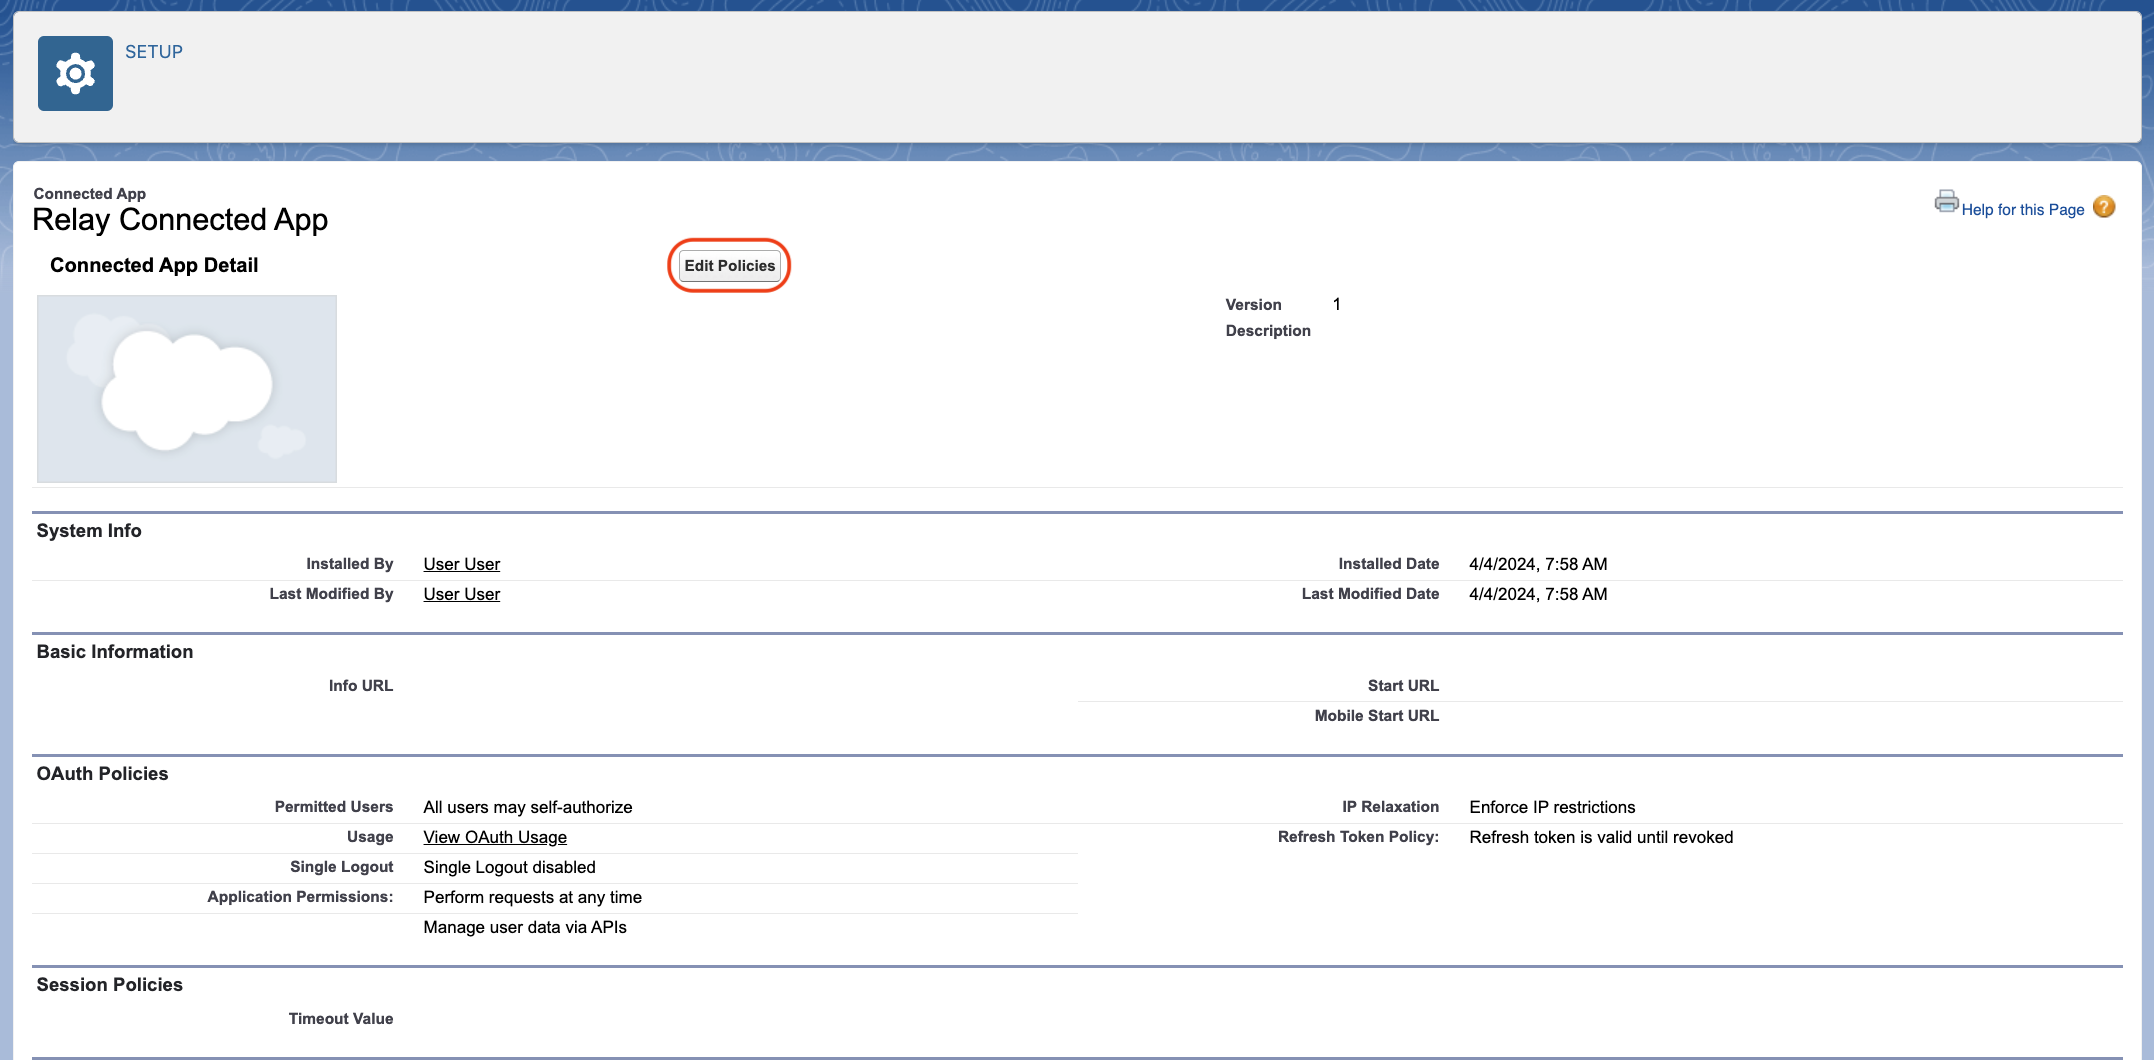
Figure 3.
Relay Connected App Policies
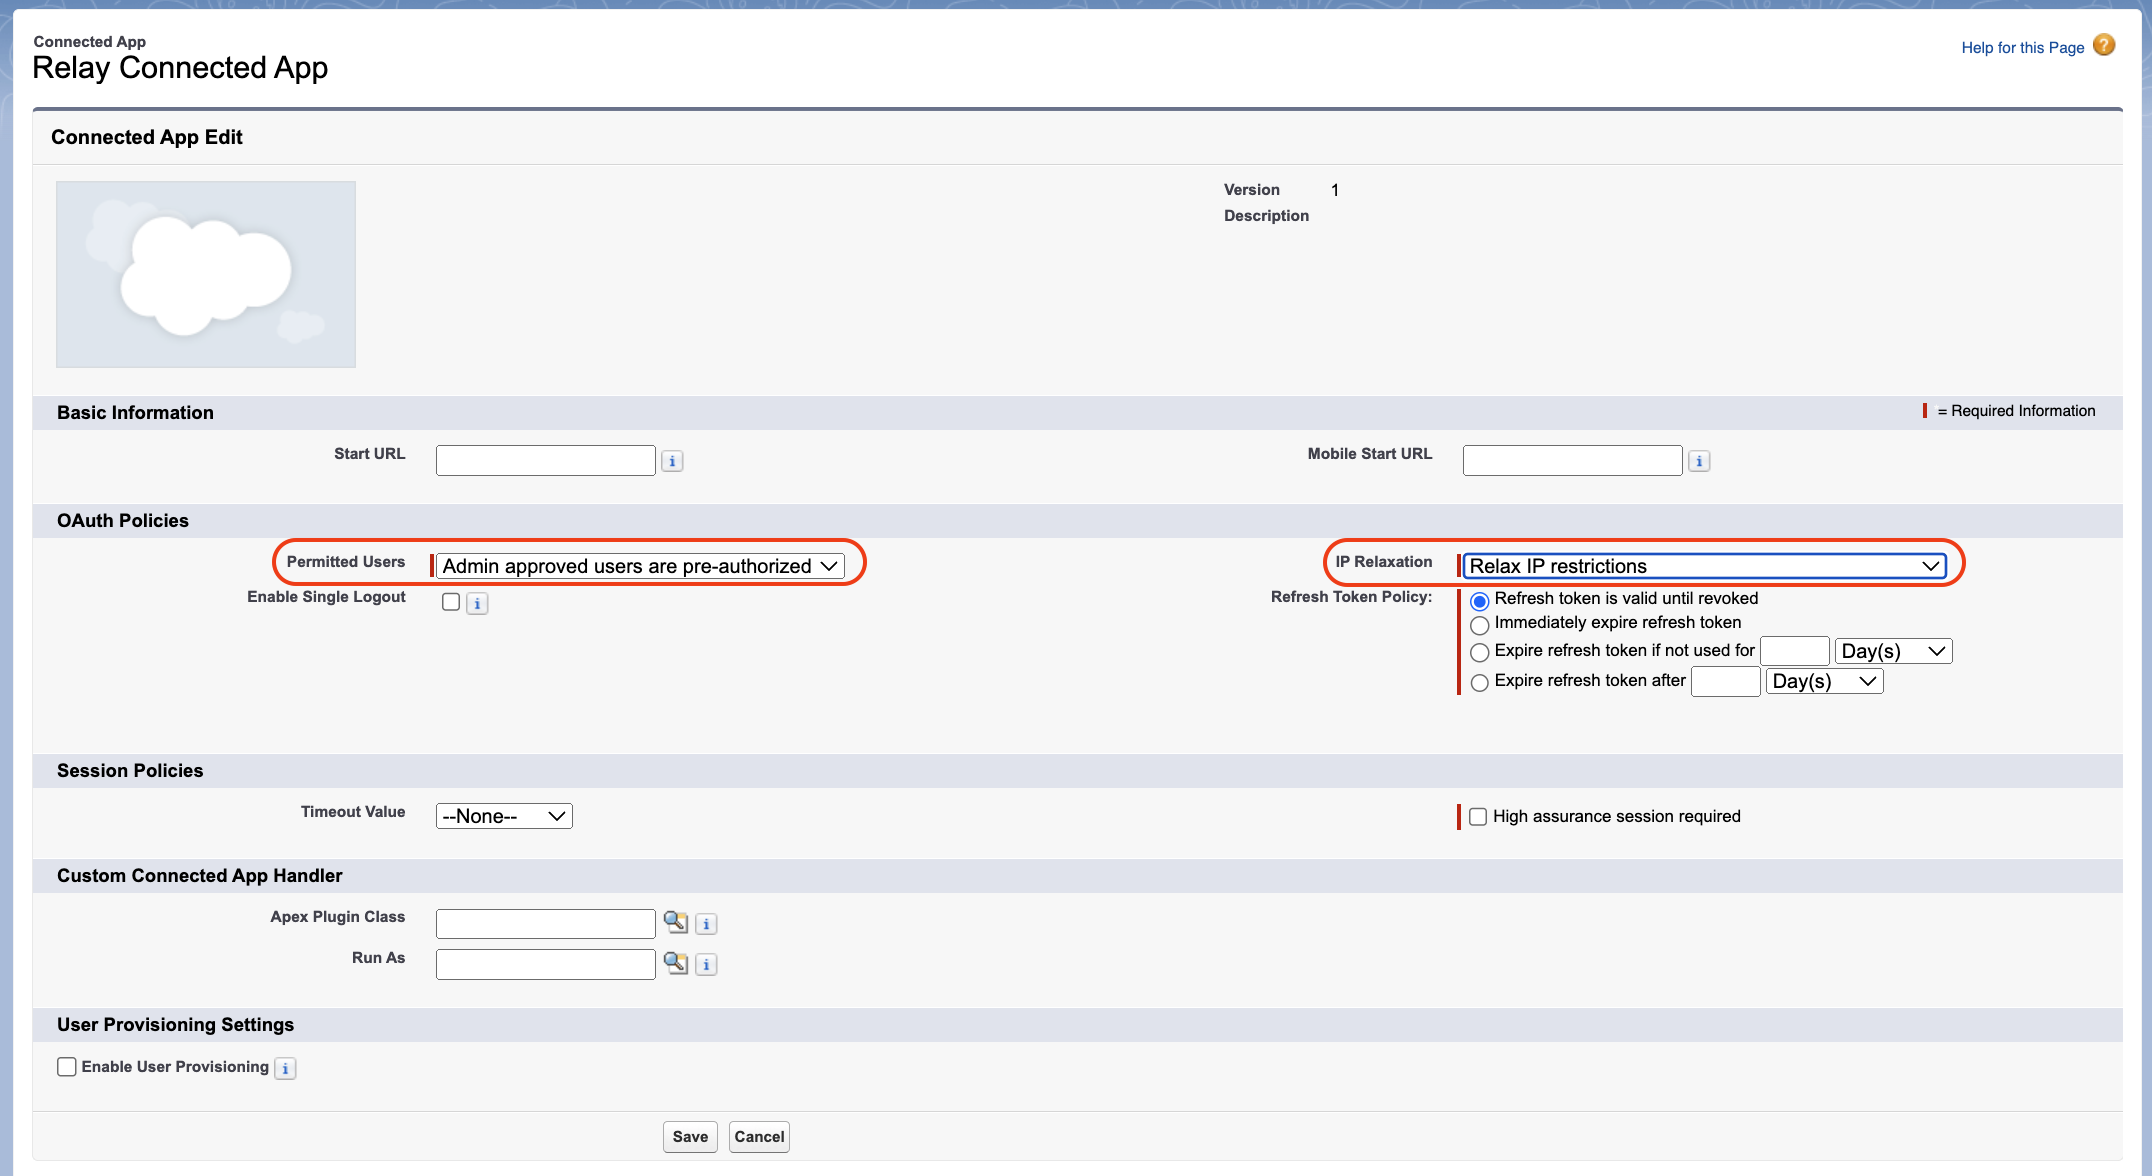
Figure 4.
OAuth Policies
Set Permitted Users to Admin approved users are pre-authorized
Set IP Relaxation to Relax IP Restrictions.
Leave all other settings at their default values.
Click Save to return to the Relay Connected App detail page
Relay Connected App Permission Sets
Locate the Permission Sets section and click the Manage Permission Sets button.
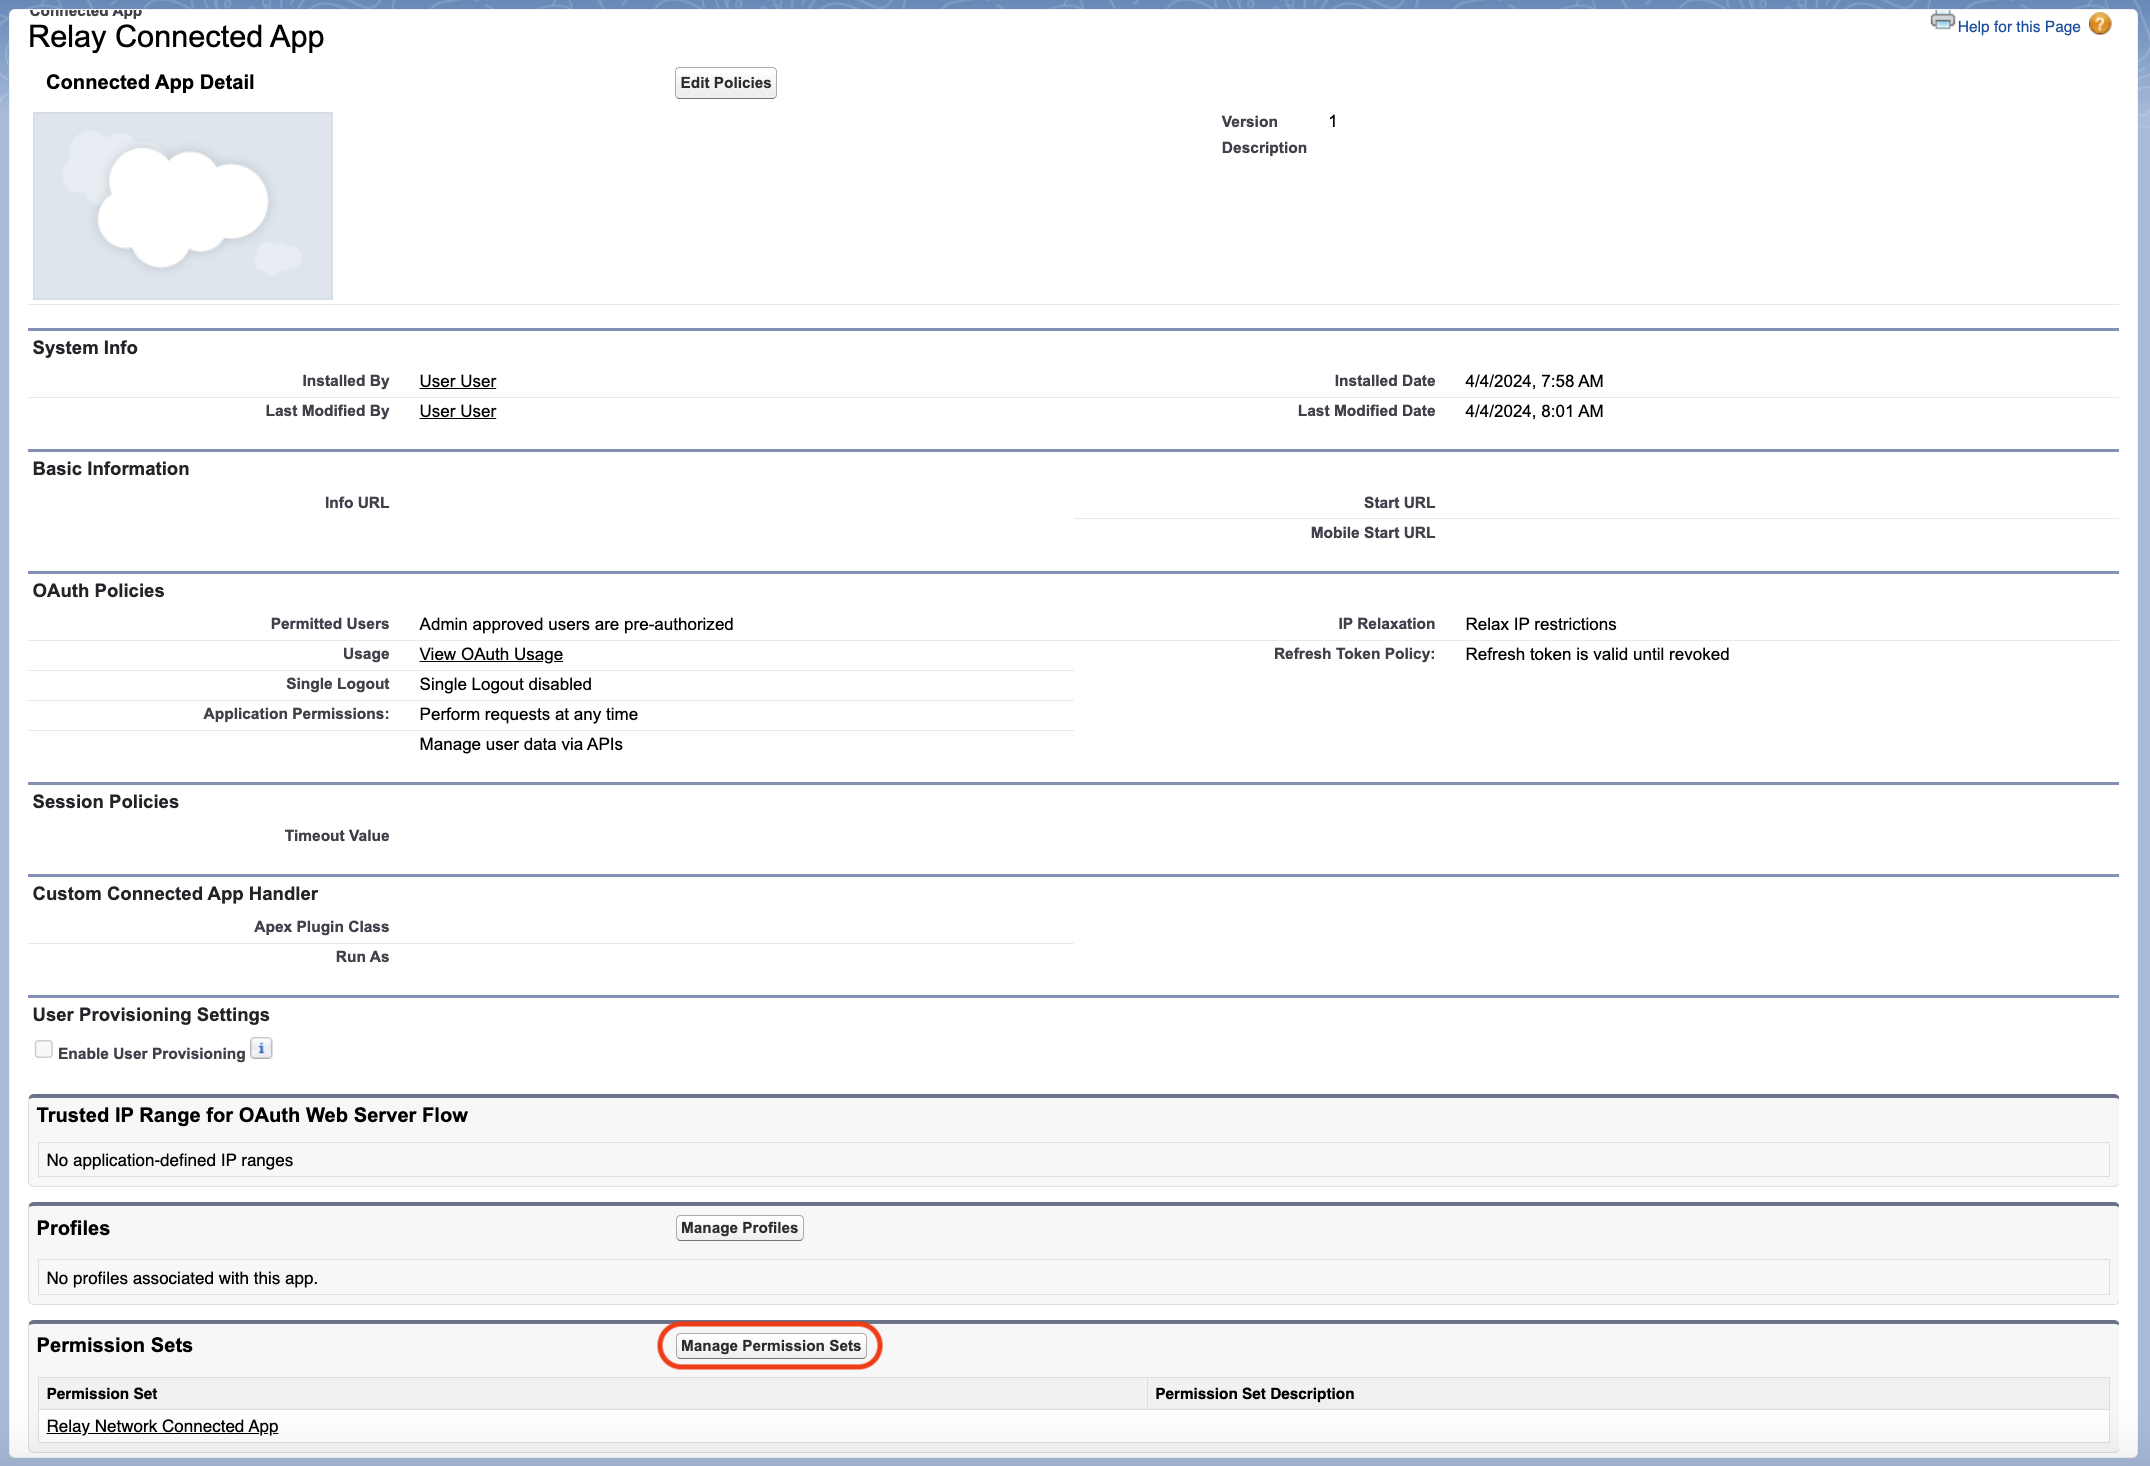
Figure 5.
Application Permission Set Assignment
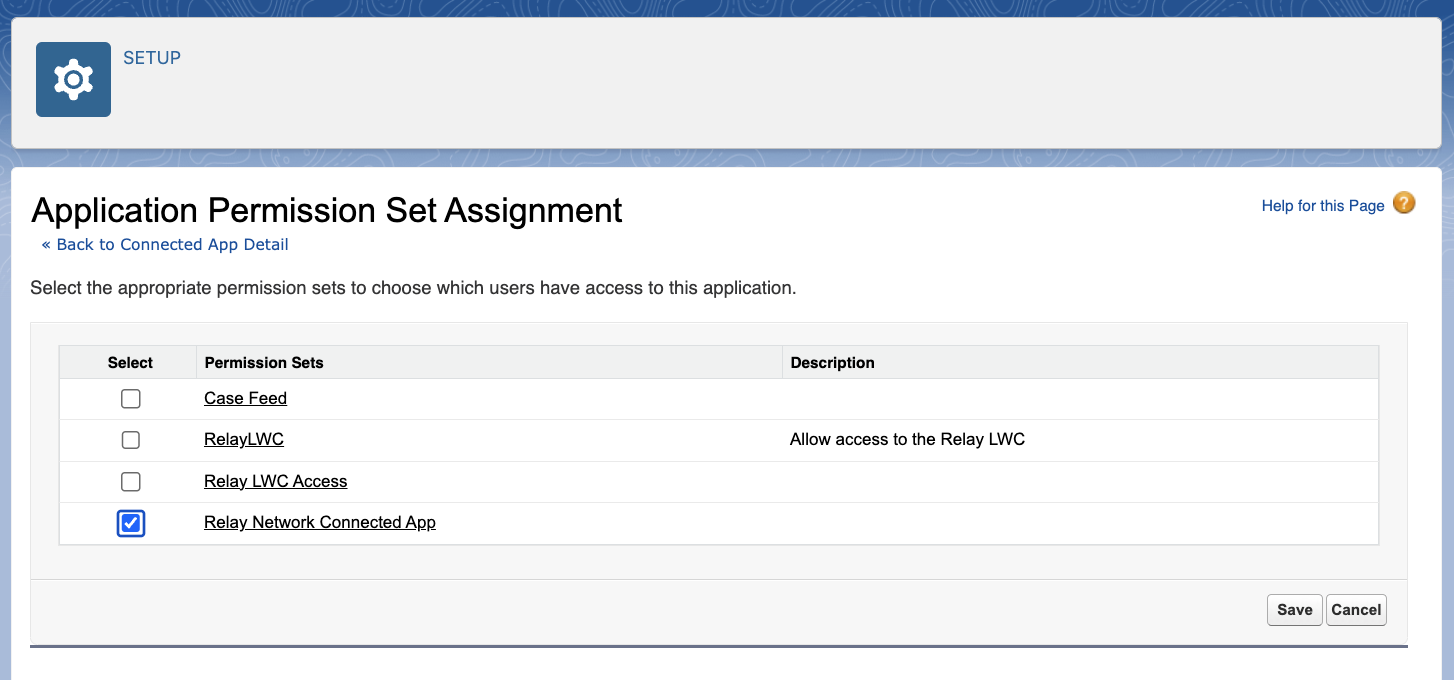
Figure 6.
Locate the Relay Network Connected App permission set, you previously created in the Permission Sets article, and check it.
Click the Save button.
You should not have a properly configured Relay Network Connected App.
3. Relay - Update Relay Push API Configuration
Navigate back the Relay CXB Portal
Edit the Push API configuration you created in the first step
Copy the Consumer Key to the Salesforce Consumer Key field of the push API configuration
Save
Locating Common Settings
NOTE
All of the below settings can ebe accessed from the App Manager drop-down menu.
PALTFORM TOOLS → Apps → App Manager → (Locate Relay Connected App) → Drop-down menu (located on the far right)
Setting | Location |
|---|---|
| From the drop-down menu select View → Manage Consumer Details |
| From the drop-down menu select Edit |
| From the drop-down menu select Manage → scroll down to the Permission Set section |
Troubleshooting
The section covers common errors related to the Connected App configuration and possible root causes.
Error | Error Description | Possible Cause |
|---|---|---|
invalid_client | invalid client credentials | The uploaded OAuth .crt file is incorrect. Please replace the certificate. |
invalid_client_id | client identifier invalid | The consumer key is incorrect. Please verify the correct consumer key has been provided to Relay. |
invalid_grant | user hasn’t approved this consumer | The provided user name does not have permissions to the connected app.
|
invalid_grant | refresh_token scope is required and the connected app should be installed and preauthorized. | Verify your OAuth Scopes are properly configured (Figure 2. #4). |