Setup Access to Receive Relay Push Events
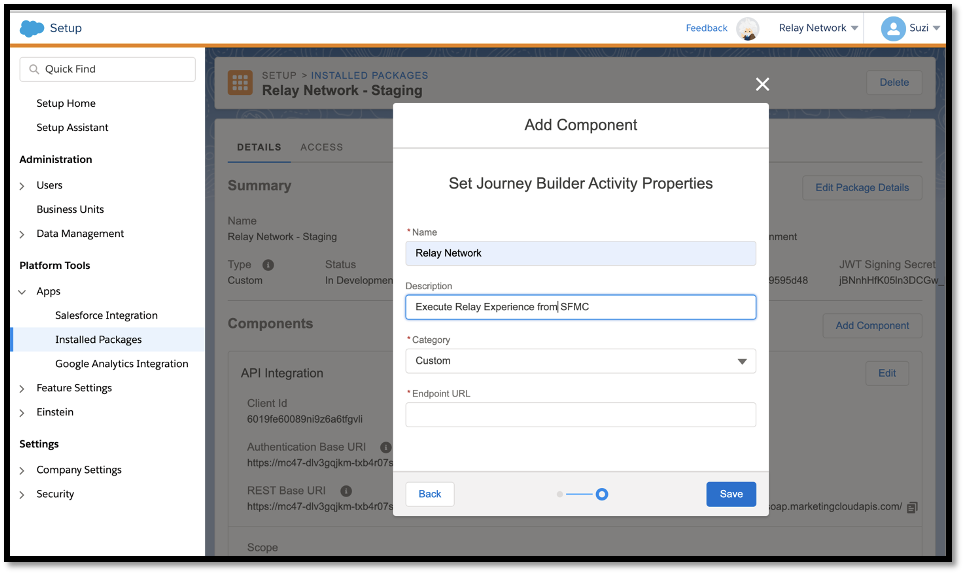
Adding API Component
Step # | Description | Salesforce Marketing Cloud |
|---|---|---|
1 |
|
|
2 |
|
|
3 |
|
|
4 |
|
|


Relay Custom Journey Activity
Clients can create two custom journey activities as part of the package if they wish to have two components displayed in the journey builder palette – one for production and one for staging. The difference being the URL, which is explained in the steps below.
Step # | Description | Salesforce Marketing Cloud | ||||||||||
|---|---|---|---|---|---|---|---|---|---|---|---|---|
1 |
|
| ||||||||||
2 |
|
|

Establishing Connectivity with CX Builder
In order to subscribe to Relay Push Events/Web Hooks which flow into the relay_response_log data extension in your Salesforce Marketing Cloud instance, certain Salesforce Marketing Cloud keys must be obtained and configured for setup in Relay CX Builder.
Checklist of Salesforce Marketing Cloud Keys to be configured in CX Builder are:
Client Id
Client Secret
REST Based URI
Authentication Base URI
JSON Web Token (JWT) Signing Secret
Account ID
Step # | Description | Salesforce Marketing Cloud |
|---|---|---|
1 |
| .png) |
2 |
|
|
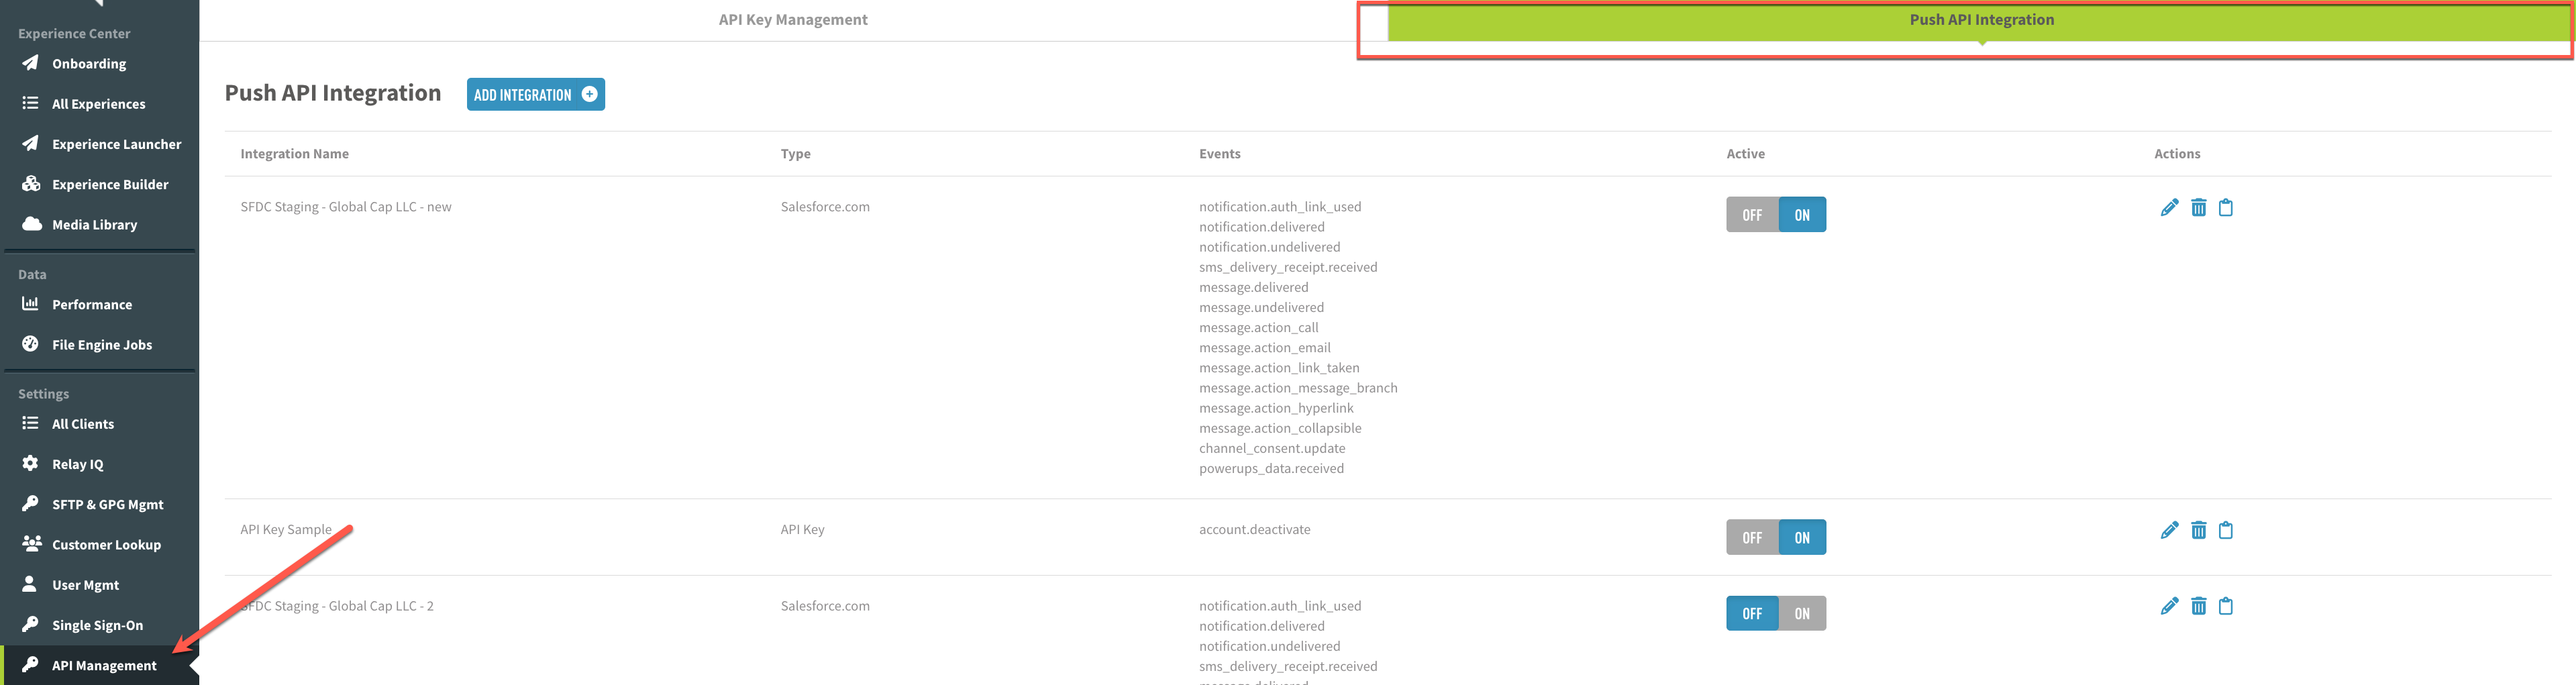
3 | Login to CX Builder to Enter the Details and Establish Connectivity Once you are signed in, click on the API Management in the left menu column. Click on the Push API Integration tab. This is the “home page” of the Push API Integration UI, where you will see a list of existing integrations for the selected client (if any exist). Note: If you do not see the API Management module on the left menu, please check that you have either Client Admin or Client User with Integration Permissions in the system |
|
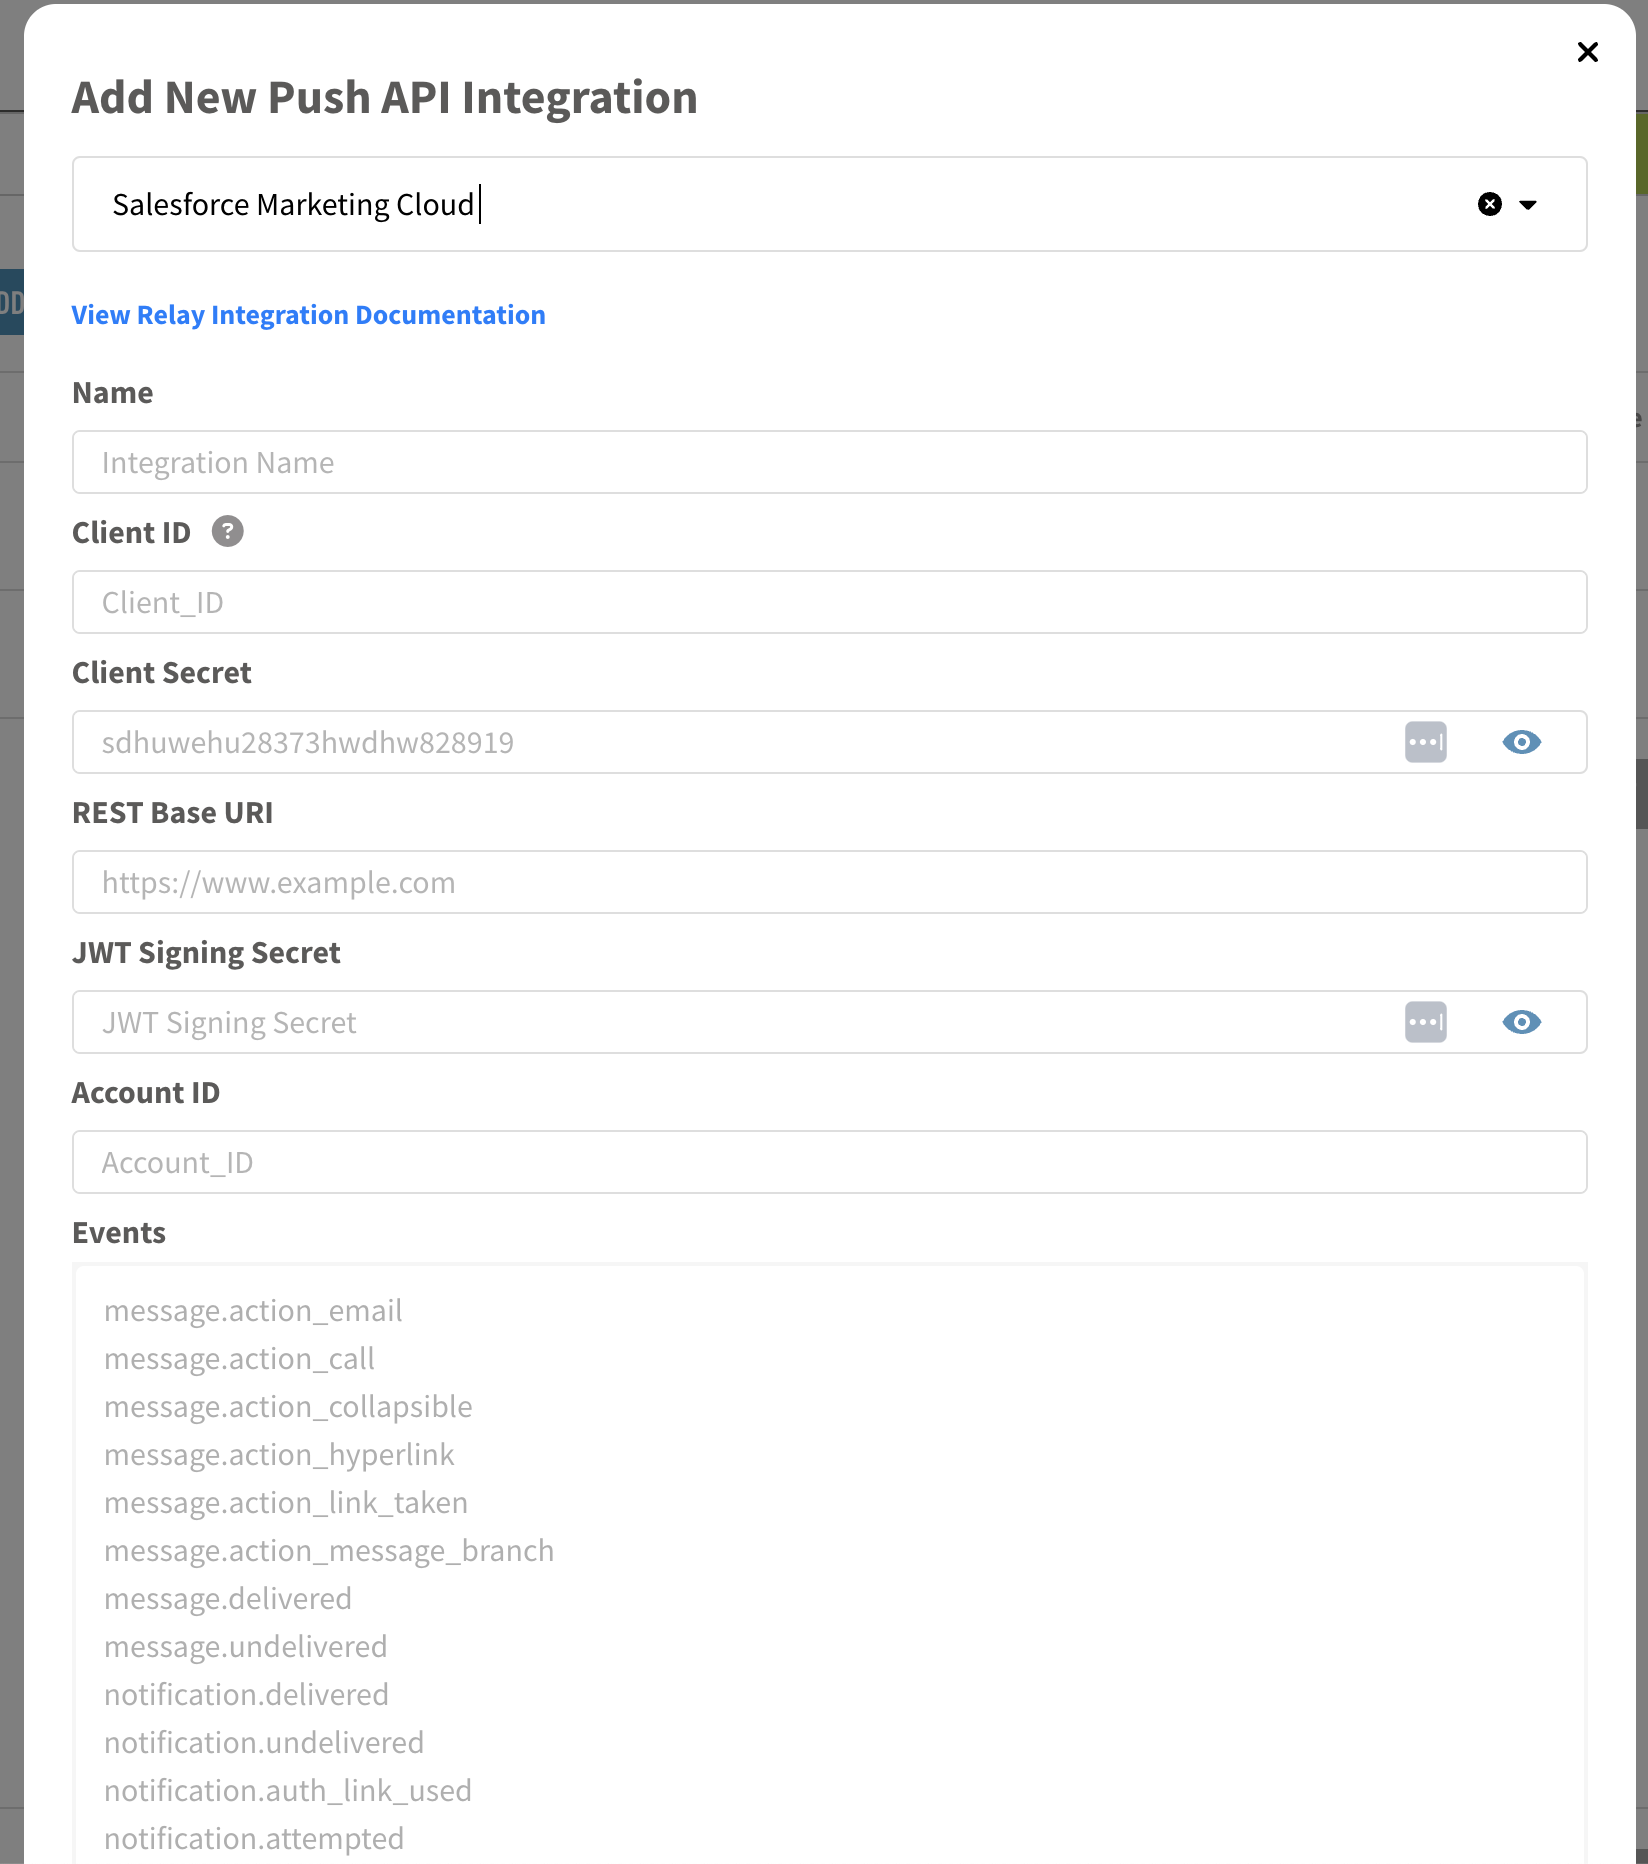
4 | To add an integration, click the “ADD INTEGRATION” button. A modal will pop up with a dropdown, where you will select Salesforce Marketing Cloud |
|
5 | Enter the details obtained from SFMC on this screen: Name: This is the name of the integration you are creating, and can be named whatever you wish to refer to it as. Version: Select the version of this integration form with which you wish to integrate your client. The latest version is selected by default. Client ID: This is the client id acquired from Salesforce, not the client’s Relay client id, and can be obtained from the client’s Salesforce Marketing Cloud instance. Client Secret: This value can be obtained from the client’s Salesforce Marketing Cloud instance. REST Base URI: This value can be obtained from the client’s Salesforce Marketing Cloud instance. Should resemble a URL and begin with: JWT Signing Secret: This value can be obtained from the client’s Salesforce Marketing Cloud instance. Authentication Base URI: This value can be obtained from the client’s Salesforce Marketing Cloud instance. Should resemble a URL and begin with: Account ID: This value can be obtained from the client’s Salesforce Marketing Cloud instance. |
|
7 | Obtain the Auth Hash from CX Builder At the bottom of this screen, you will see an Auth Hash, use the copy icon to the right to copy this value and save it for the next step where you will add it to SFMC |
|

.png)

Setup Access to Relay’s Rest APIs to Trigger Experiences
In order to call the Relay APIs to trigger experiences from your Salesforce Marketing Cloud instance you need to store certain keys in Salesforce Marketing Cloud that have been provided by your Relay Client Success representative.
Checklist of Salesforce Marketing Cloud Keys to be sent to Relay are:
Auth Hash
Data Extension Mapping:
Field | Staging Connection | Production Connection |
|---|---|---|
Metadata Id | 1 | 2 |
Metadata Name | relayauthhash_staging | relayauthhash_production |
Metadata Value | Auth Hash Value from CX Builder Staging | Auth Hash Value from CX Builder Production |
Step # | Description | Salesforce Marketing Cloud |
|---|---|---|
1 | Store the Auth Hash in Salesforce Marketing Cloud:
|
|
.png "image(2).png")
.png "image(3).png")
Update External Keys
Step # | Description | Salesforce Marketing Cloud |
|---|---|---|
1 |
|
|
2 |
|
|
3 |
|
|
4 |
|
|
.png "image(4).png")
.png "Screenshot 2024-06-24 at 4.30.09 PM(1).png")
.png "image(5).png")
.png "Screenshot 2024-06-24 at 4.30.09 PM(2).png")
Adding Relay Network Data on the Contact Builder
For the Salesforce Marketing Cloud Journey Builder to pick up the correct values for a ccid it is necessary to add the relay_network_data data extension to the Contact builder attribute group.
Step # | Description | Salesforce Marketing Cloud | |
|---|---|---|---|
1 |
|
| |
2 |
|
| |
3 |
|
| |
4 |
|
| |
5 |
|
| |
6 |
|
|


.png "Screenshot 2024-06-20 at 3.07.48 PM(1).png")

