The RelayOnboardingRequest resource is an Apex-defined data type that is used to build a request object for onboarding a user to the Relay platform and optionally sending a Relay experience at the time of onboarding.
Creating a RelayOnboardingRequest Resource
Create a RelayOnboardingRequest flow resource:
Add a new Flow resource by clicking New Resource
a. If the Flow Toolbox is not visible click on the Toggle Toolbox icon in the upper right portion of the screen
Populate the New Resource fields as follows:
Field | Description |
|---|---|
Resource Type | Select Variable. |
API Name | A value, unique to the current flow. It must begin with a letter and can’t end with an underscore. It also can’t have two consecutive underscores. |
Description | A desciption of the resource and its purpose within the flow. |
Data Type | Select Apex-Defined. |
Allow multiple values (collection) | If you are onboarding a single user to Relay, then leave this value un-checked. If you are onboarding a batch of users to Relay, then check this value. |
Apex Class | Select RelayOnboardingRequest. |
Available for input | Leave un-checked |
Available for output | Leave un-checked |
Assigning Values to the Onboarding Resource
Once you have the resource created you will want to leverage it within your flow. This is accomplished by adding an Assignment element to your flow. Within the assignment element, you can user either hardcoded values or reference other record fields or variables from your flow.
Salesforce Docs
Field | Description |
|---|---|
address1 | Optional. The street address for the user. |
assetId | Optional. If you would like to override the default branding of the Relay message you can provide a Relay Asset ID. Please contact your Relay CSM for more information related to asset IDs. |
Id | Optional (unless using dynamic inputs then it is required). The Salesforce record object to be associated with this Messaging Request. This is required when you are using dynamic input_ properties with the message. |
CCID | Required. See: Relay CCIDs |
city | Optional. The city of the user’s address. |
clientMessageTag | Optional. A free form text field that will be passed along will all future events related to this onboarding request. |
consent | Required. The {{glossary.TCPA}} SMS consent for the mobile phone number provided. |
dateOfBirth | Optional. The birth date of the user. This should be a Salesforce DateTime field. |
dynamicInputs | Optional. If specified, the variable must be a list of type Apex RelayDynamicInput. This property allows for hyper personalization of each individual user’s triggered message. See: Personalization with Dynamic Inputs |
firstName | Required. The first name of the user. |
gender | Optional. The gender code |
lastName | Optional. The last name of the user. |
last4SSN | Optional. The last four digits of the user’s social security number |
mobilePhone | Required. The mobile phone number for the user. |
postal_code | Optional. The postal code of the user’s address. |
productGroupId | Required. The product group ID that will be assigned to the user. A user can only be assigned to a single product group. |
secondaryAccountId | Optional. This field allows you to associate a secondary ID to the user. This is often used to associate the user with a secondary backend system that uses an identifier that is different from the CCID value. |
state_province | Optional. The state or province of the user’s address. |
triggerId | Required. The Relay trigger ID associated with the Relay message. This can either be the Relay assigned UUID or a client defined trigger ID. |
Examples
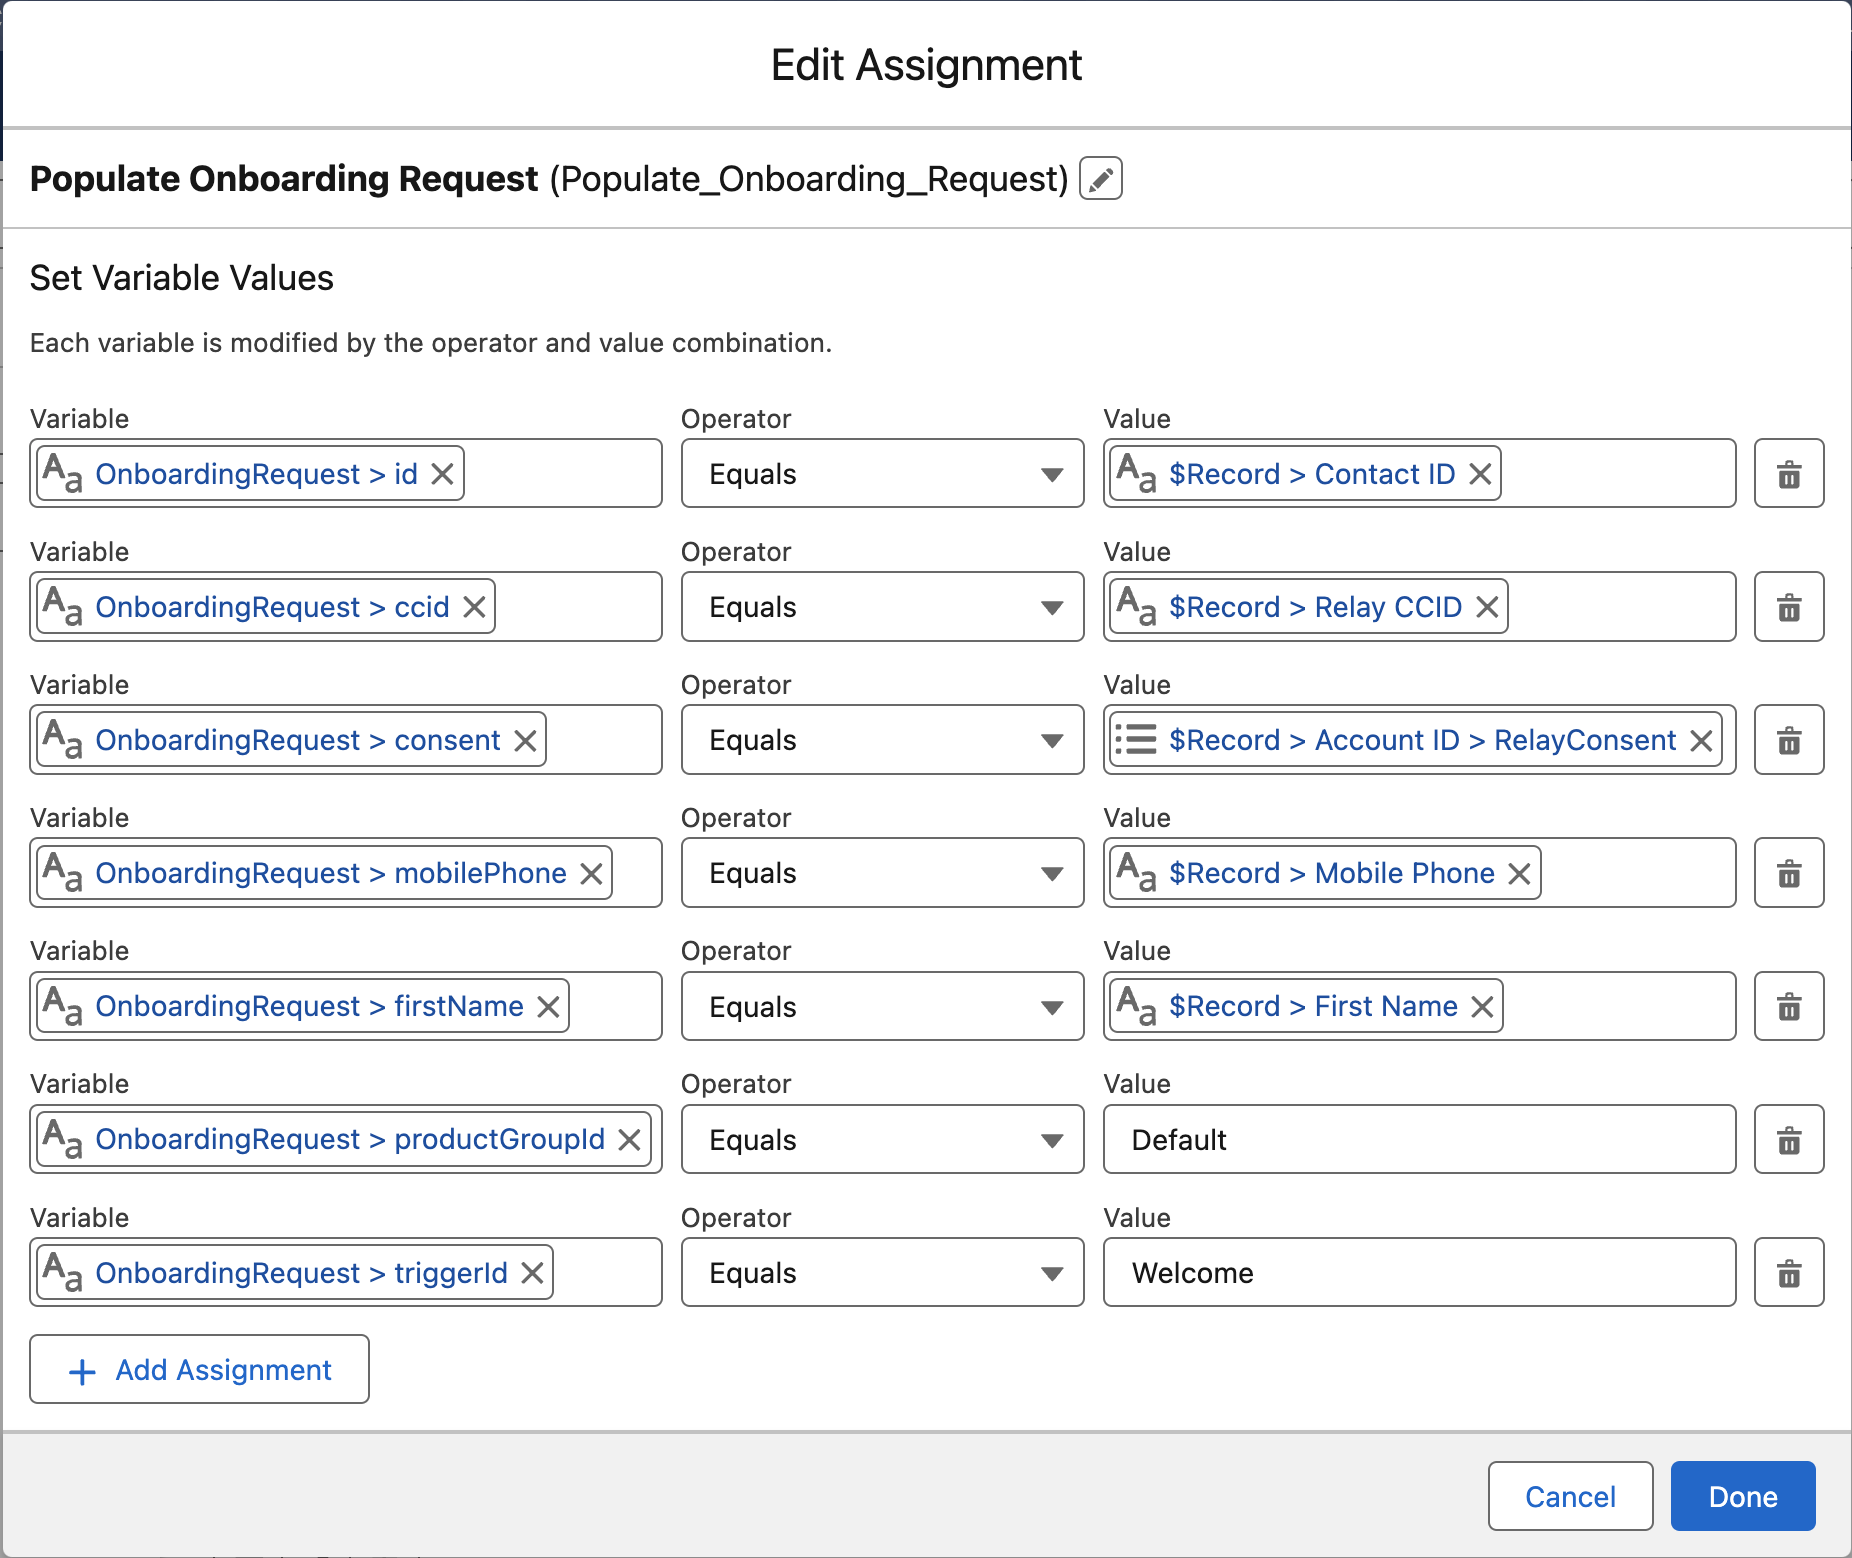
Example 1 - Populating the RelayOnboardingRequest
Below is an example RelayOnboardingRequest assignment.
Important
This is just an example of different ways you can populate the RelayOnboardingRequest resource and in no way represents a strict implementation requirement.
Notable:
The majority of the settings are referring to the Record that triggered the flow.
The ccid field is retrieving the value from a custom Relay CCID field that was added to the Record. You can pull your value from any field you choose. It is not required to create a specific Relay CCID field.
The consent field is retrieving the value from a customer field that was added to the account object. You can pull your consent value from any existing field you may have.
The productGroupId and triggerId are using hard-coded values.
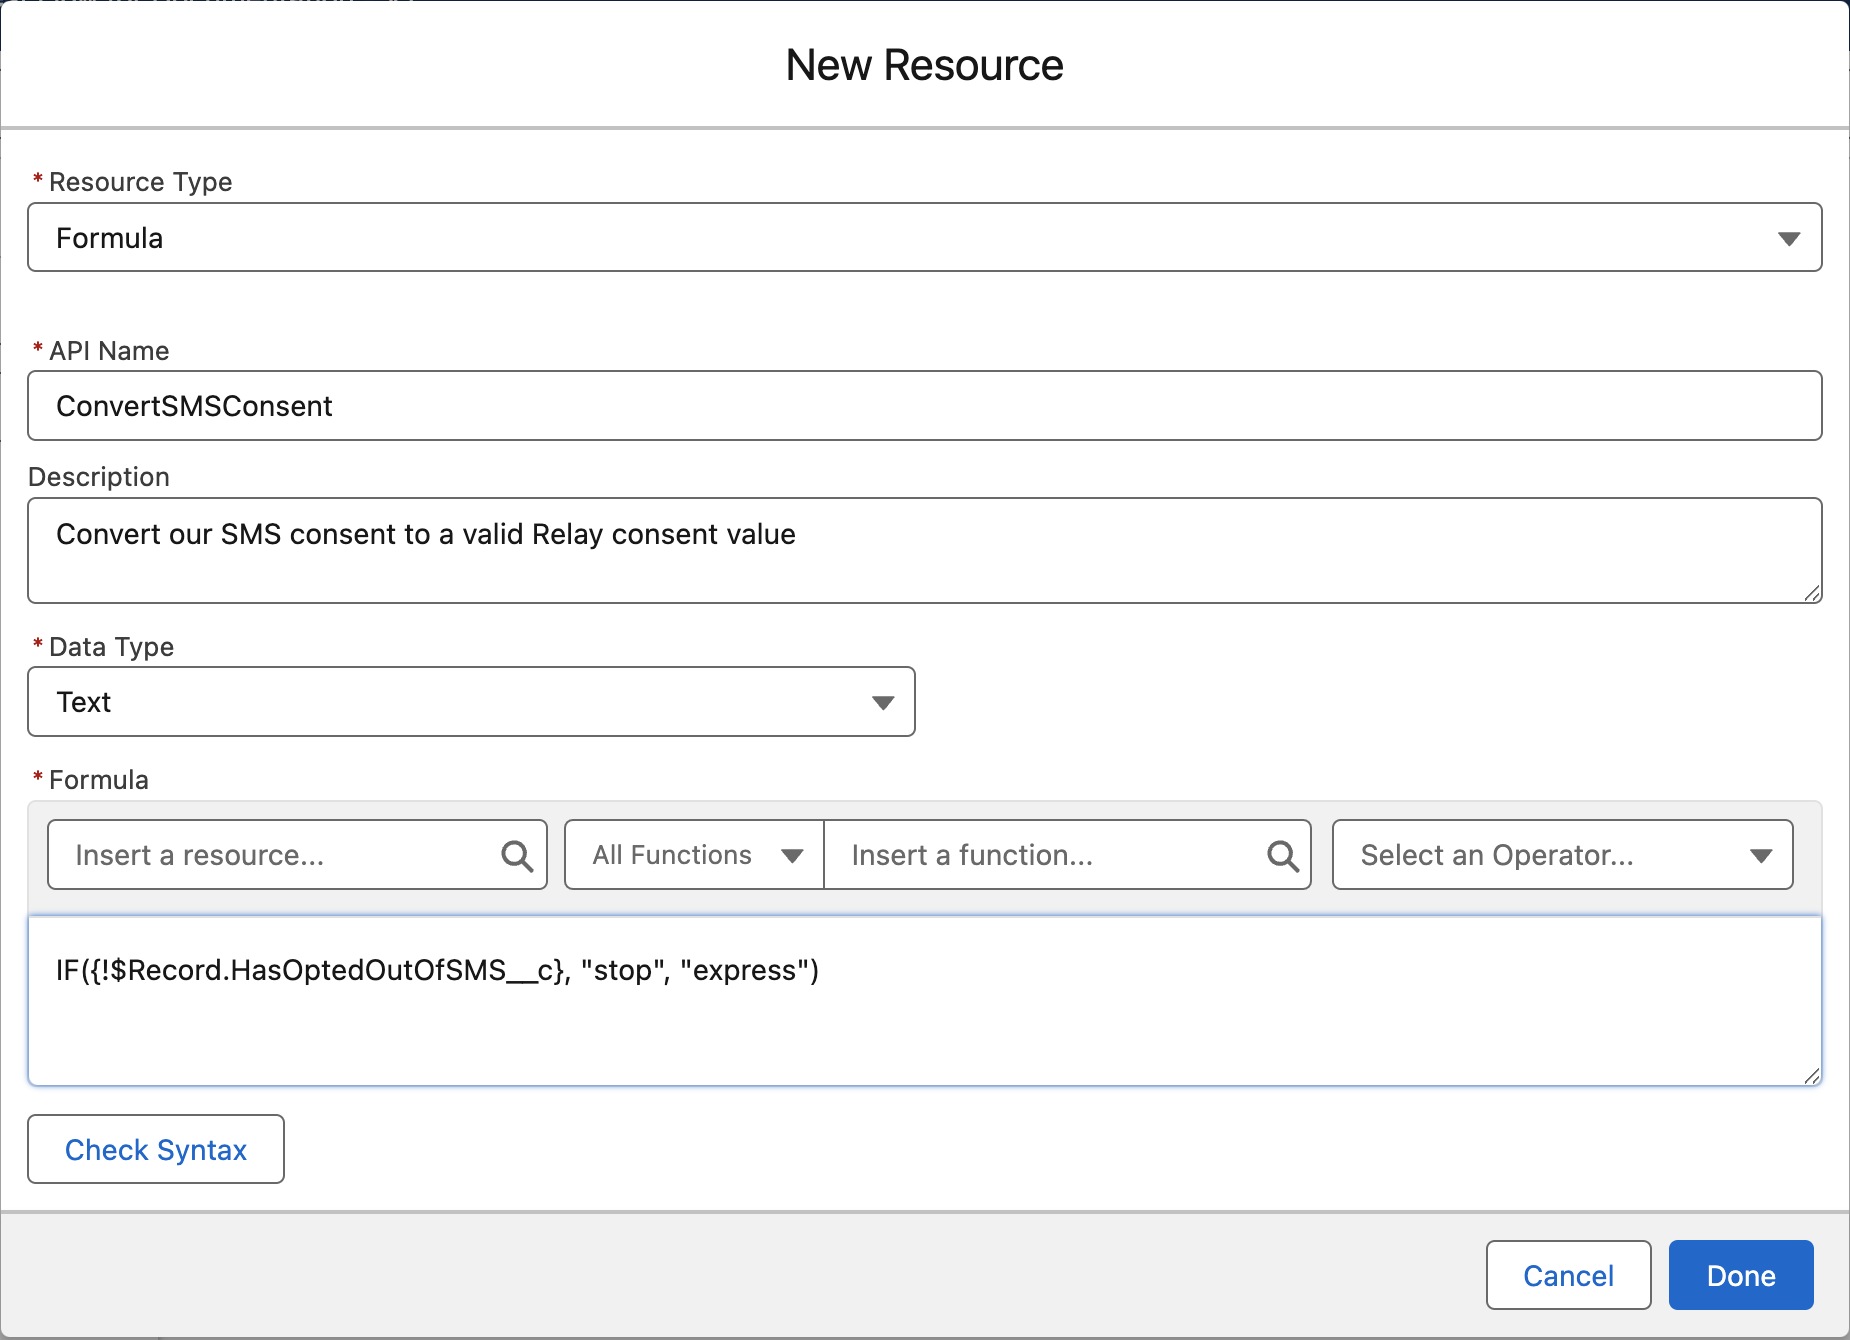
Example 2 - Translate SMS Consent Values
In this example we assume your TCPA SMS consent values are not the same as required by Relay and therefore require a translation.
Note
This example is using a formula resource to perform the consent translation. You could create a custom field on an existing object and implement the formula there. Having a custom field adds the benefit of keeping the logic in once place and not having to duplicate it. However, if you can’t add a new custom field to your object this is a good fall back option.
Example Assumption:
The Record object has an existing TCPA consent field called HASOptedOutOfSMS__c.
The HasOptedOutOfSMS__c field is a simple checkbox that signifies if the user has opted out to receive SMS text messages. In the case of this fictitious client, they only support express consent and do not send any text messages requirement express written consent so a simple boolean value will suffice.
Create a new flow resource
Select Resource Type of formula
Select Data Type of text
For the formula enter
IF({!$Record.HasOptedOutOfSMS__c}, "stop", "express")
In the assignment statement for the RelayOnboardingAction (see Example 1 above) you can now set the consent value to the formula.