This article documents all of the Relay Message List component’s configuration properties.
Each instance of the component, even on the same page, maintains its own property settings.
The component’s properties can be changed at anytime.
To access the Relay Message List properties, edit the page layout.
Click the gear icon (Fig. 1-1).
Select the Edit Page option (Fig. 1-2).
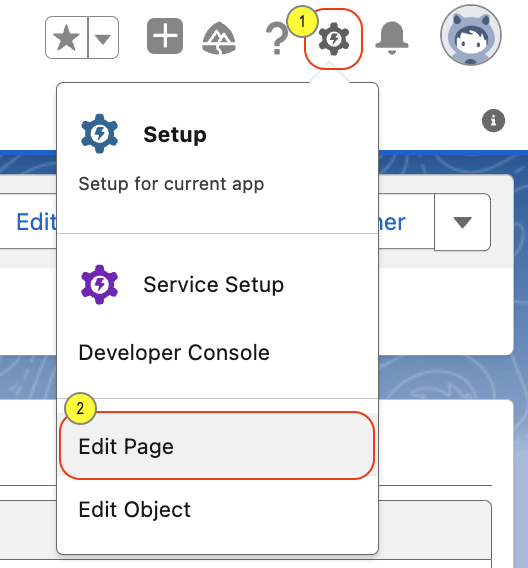
Fig. 1 - Salesforce Gear Icon Menu
Locate the existing Relay component within the page layout and click on it. Clicking the Relay component will open its property editor on the right side of the window.
Edit the properties and save.
Component Properties Panel
NOTES
Many of the properties require you to provide a Salesforce field name.
This field name must be a the fully qualified field name of the record whose page you are actively editing. Do not provide the field’s label for these properties, use the actual file name.
The field name can use Salesforce dotted notation to access a parent field of the current record. For example, if you are on the Contact record and would like to provide the CCID Field as the ID of the contact’s parent Account record you could provide the value of: Account.ID
When providing a custom field name be sure you include the __c as part of the field name. For example: RelayCCID__c
For the individual Address fields, make sure you have a solid grasp on how Salesforce compound fields are accessed. See the Salesforce Docs: Address Compound Fields

Property | Description |
|---|---|
Relay Client ID | Optional. This field only needs to be populate when your org is setup for multi-client use. The majority of installations are not setup for multi-client use. If you are using the multi-client setup, then provide the Relay Client ID for this component. Each component instance can specific a different Client ID. |
Experience Filter | Optional. Provide a list of Relay message labels used to filter the list of messages presented in the components main view. If providing more than one label, separate each with the pipe symbol (`|`). This property can be used in conjunction with the Experience Filter Field property at which point the two field’s values will be combined together.
|
Experience Filter Field | Optional. Provide the field name whose value contains a list of Relay message labels, each separated with the pipe symbol (‘|’). Typically this field will be of type formula that dynamically builds the list of label filters based on other values of the current record.
|
Launch With | Select the method which the message will be sent to the user. Valid options are: Onboarding: Use the Relay onboarding method to onboard the user and send the selected message(s). |
Deactivate Previous Connections |
Determine if previous user’s connections will be removed from the user profile in the Relay system. A connection is a mobile number and TCPA consent value. If this option is enabled then during the onboarding process, all previous connections will be removed from the user’s profile (stored in Relay) and the newly provide information will be added. |
Enable Multi Selection | If checked, then the agent is able to select multiple Relay messages to send all at once. You can send a maximum of 10 messages at one time.
|
CCID Field | Required. Provide the field name that contains the value to be used for the Relay CCID. |
Consent Field | Required. Provide the field name that contains the TCPA consent value in Relay format. |
Mobile Phone Field | Required. Provide the field name that contains the user’s mobile phone number. |
First Name Field | Required. Provide the field name that contains the user’s first name. |
Last Name Field | Optional. Provide the field name that contains the user’s last name. |
Date of Birth Field | Optional. Provide the field name that contains the user’s date of birth. The provided field should have a field data type of Date. |
Last 4 SSN | Optional. Provide the field name that contains the last four digits of the user’s social security number.
|
Secondary Account ID Field | Optional. This property allows you to provide an alternate, secondary, identifier for the user. |
Address Street Field | Optional. The street field name for the address. For example, this field is known as MailingStreet on Contact. |
Address City Field | Optional. The city field name for the address. For example, this field is known as MailingCity on Contact. |
Address State Code Field | Optional. The state field name for the address. For example, this field is known as MailingState on Contact. |
Address Postal Code Field | Optional. The postal code field name for the address. For example, this field is known as MailingPostalCode on Contact. |
Product Group Field | Optional. The object field name that contains the Relay Product Group ID to be used for the sent message. Product groups control branding in the Relay Feed. |
Asset ID Field | Optional. The object field name that contains the Relay Asset ID to be used for the sent message. The Asset ID, is used to override the default branding icon on the message. |
Client Message Tag | Optional. Allows you to provide a field name whose value will be passed through the Relay platform. All Relay messages events, generated from this LWC instance, will contain this value. |
Top-of-Feed Trigger | Optional. If this field is populated, then any selected messages will be posted to the user’s Feed without sending an SMS for each message. Then, after posting all the messages to the Feed, this messages will be sent with an SMS containing a link to send the user to the top of their feed.
|
Launched By Name | The name of the user who initiated the Relay onboarding or messaging action. |
Launched By Source | The source service / system that initiated the Relay onboarding or messaging action. |
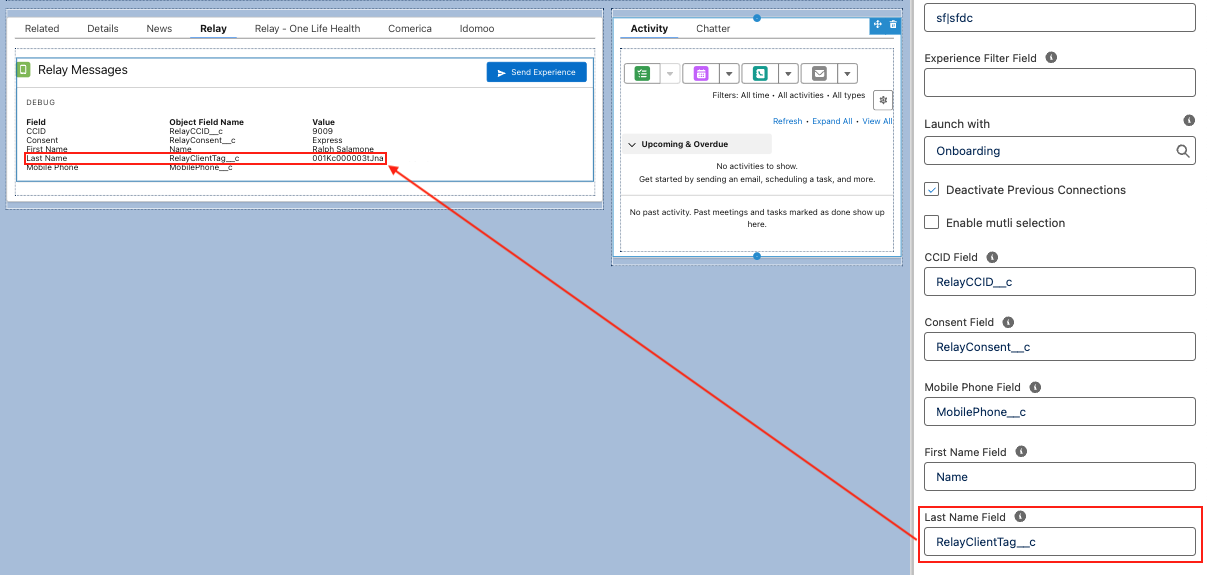
Enable Debugging | If enabled, the LWC will display the calculated values, based on their property settings above, for the following fields: CCID, First Name, Last Name, Consent, Mobile Phone Number. This can aid in troubleshooting the field names your are providing for this component.
|
HINT
Verifying Field Values Before Sending:
You can verify field values before sending the experience to Relay by leveraging the Relay LWC debugging information when configuring it.
Edit the Relay LWC as described above
Notice several debugging values are automatically displayed
Anytime you change a Relay field configuration and tab to the next field the debug value will automatically be updated
To verify a value for a configuration option that is not visible in the DEBUG section, simply change the
Last Namesetting to the field you want to verify. Just remember to change it back before saving.
HINT
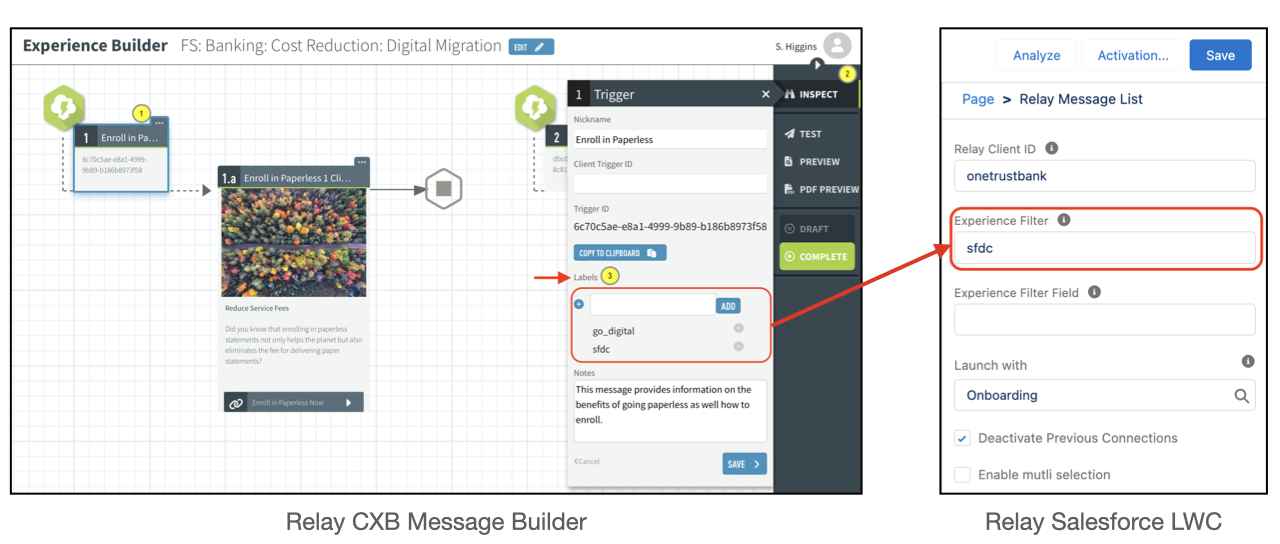
Locating Message Labels Used for Filtering:
The message filter labels are defined in the Relay CXB Message Builder when creating or editing messages. Labels can be added or removed at any time and are automatically reflected in Salesforce the next time the list is refreshed.
The below image show where in the Relay CXB the message filter labels are created. In this example, all messages will be filtered out unless they contain the sfdc label. If you would like display all of the Relay messages targeting the “Go Digital” campaign, update the LWC Experience Filter value to contain “sfdc | go_digital” (without the quotes).